AEG 740 D User manual

740 D
Campana extractora
Dunstabzugshaube
Cooker Hood
Cappa aspirante
Kjøkkenventilator
Instrucciones de montaje y manejo
Montage- und Gebrauchsanweisung
Operating and Installation Instructions
Istruzioni di montaggio e uso
Montering- og bruksveiledning
34
Printedonrecycledpaper
AEG - putting words into action
Contents
Safety warnings 35
foruser
for kitchen unit installer
Introduction 37
Extractorversion
Filterversion
Hood operation 38
Maintenance and care 39
Metalgreasefilter
Carbonfilter 40
Changingthelightbulb 41
Cleaning 42
Special accessories
Technicalassistanceservice
Guaranteeconditions 43
Service
Technic Details 45
Installation 46
Electricalconnection
Wall unit mounting 47

35
Safety warnings
for user
• Alwayscoverlightedelements, to prevent excess heat from
damaging the appliance. In the case of oil, gas and coal fired
cookers it is essential to avoid open flames.
• Also, when frying, keep the deep frying pan on the cooker top/cooker
undercarefulcontrol.
• Thehotoil in the frying pan might ignite duetooverheating.
• The risk of self-ignition increases when the oil being used is dirty.
• It is extremely important to note that overheating can cause a fire.
•Never carry out any flambé cooking under the hood.
•Always disconnect the unit from the power supply before
carrying out any work on the hood, including replacing the
light bulb (take the cartridge fuse out of the fuse holder or switch off
theautomatic circuit breaker).
•It is very important to clean the hood and replace the filter at
the recommended intervals. Failure to do so could cause
grease deposits to build up, causing a fire hazard.
for kitchen unit installer
• When used as an extractor unit, the hood must be fitted with a
120mmdiameterhose.
• If the fumes must be forced out through the wall, you must obtain a
MKZ sizable wall exhaust pipe (with external exhaust and air intake),
E-Nr.- 610 899 004 (Ø 120 mm) which is one of our optional parts.
•When installing the hood, make sure you respect the following
minimum distance from the top edge of the cooking hob/ring
surfaces:
electric cookers 600 mm
gascookers 650 mm
coal and oil cookers 700 mm min.

36
• Thenationaldecreeonfuel-burningsystemsspecifies a maximum
depression of 0.04 bar in such rooms.
• The air outlet must not be connected to chimney flues or combustion
gas ducts. The air outlet must under no circumstances be connected
toventilationductsforroomsinwhichfuel-burningappliancesare
installed.
• Itisadvisabletoapplyforauthorizationfromtherelevantcontrolling
authority when connecting the outlet to an unused chimney flue or
combustion gas duct.
The air outlet installation must comply with the regulations laid down
bytherelevantauthorities.
• When the unit is used in its extractor version, a sufficiently large
ventilationholemustbeprovided,withdimensionsthatare
approximately the same as the outlet hole.
• Nationalandregionalbuildingregulationsimposeanumberof
restrictionsonusinghoodsandfuel-burningappliancesconnectedto
a chimney, such as coal or oil room-heaters and gas fires, in the
sameroom.
• Hoods can only be used safely with appliances connected to a
chimneyiftheroomand/orflat(air/environmentcombination)is
ventilatedfromoutsideusingasuitableventilationholeapproximately
500-600cm2 largetoavoid the possibility of a depression being
createdduringoperationofthehood.
• Ifyouhaveanydoubts,contactthe relevant controlling authority or
buildinginspector’soffice.
• Since the rule for rooms with fuel burning appliances is “outlet hole of
the same size as the ventilation hole”, a hole of 500-600 cm2, which
is to say a larger hole, could reduce the performance of the extractor
hood.
• If the hood is used in its filtering function, it will operate simply and
safelyin the above conditions without the need for any of the
aforementionedmeasures.
• When the hood is used in its extractor function, the following rules
mustbefollowedtoobtainoptimaloperation:
— short and straight outlet hose
— keep bends in outlet hose to a minimum
— never install the hoses with an acute angle, they must
always follow a gentle curve only
— keep the hose as large as possible (120 mm Ø min.).
• Failure to observe these basic rules will drastically reduce the
performanceandincreasethenoiselevelsoftheextractorhood.

37
Introduction
Extractor version
• The hood is supplied as an extractor unit and can also be used with
afilteringfunctionbyfittingoneactivated carbon filter (special
accessory).
• You willneedoriginalAEG activated carbon filter for this function
(see Special Accessories).
• The air is discharged to the outside through a pipe, which must be
fitted to connection flange A . Fig. 1.
• For the extractor version this pipe must have a diameter of 120 mm.
Fig. 1
Filter Version
• The air is filtered and recirculated into the kitchen.
• You will need an original AEG TYPE303 activated carbon filter
for the filtering function. (See Special Accessories).
A
Fig. 2

38
Hood Operation
• Thehoodisfitted with a variable speed motor.Themosteffectiveuse
of the hood is obtained by switching it on a few minutes before you
startcooking and leaving it on a for approximately 15minutes after
youhavefinished,thusensuringallcooking odours are eliminated.
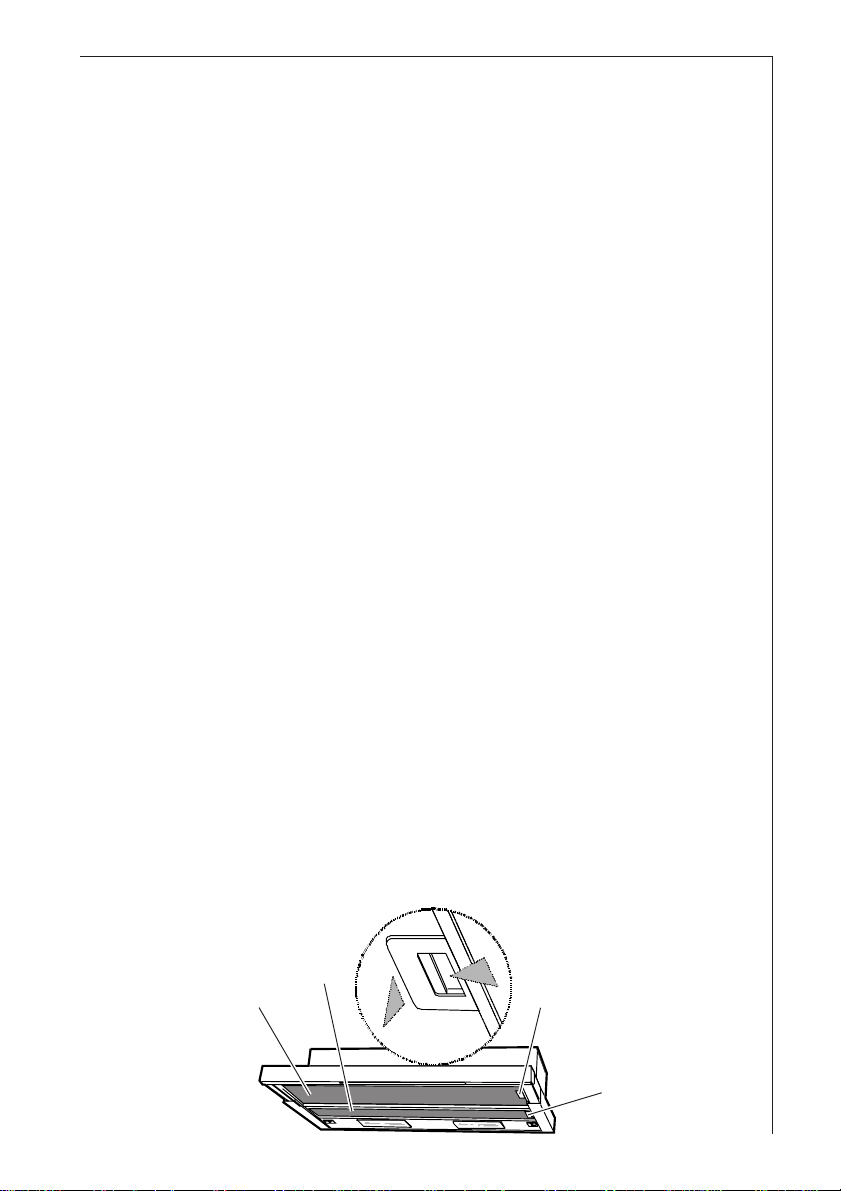
The hood function control switches are located on the top side of the
drawer, and can be accessed by extracting the drawer itself:
•Light switch: this switch is used to turn the light fitted in the hood
onandoff.
•Extractor fan switch: this is used to turn the fume and vapour
extractor fan motor on and off and to select one of the three speeds
available.
Light switch
Extractor
fan switch
39
Maintenance and care
•The hood must always be disconnected from the mains power
supply before beginning any maintenance work.
Metal grease filter
• Thepurpose of the grease filters is to aspirate greaseparticles which
form during cooking and it must always be used, either in the
externalevacuationorinternalrecyclingfunction.
Attention:themetalgrease filters must be removed and washed,
eitherbyhandorinthedishwasher, every four weeks.
Open the metal grease filter
• Pull the drawer all the way out and press the handles Q1/Q2 locking
thegreasefilter N1,N2 first towards the opposite side and thendown.
Fig. 4.
Hand washing
Soakgreasefilters for about one hour in hot waterwitha grease-
looseningcleaner,thenrinseoffthoroughlywithhotwater.Repeat
the process if necessary. Refit the grease filters when it are dry.
Dishwasher machine
Placegrease filters in dish washer.Select most powerful washing
programmeandhighesttemperature,atleast65°C. Repeat the
process. Refit the grease filters when it are dry.
When washing the metal grease filter in the dishwasher a slight
discoloration of the filter can occur, this does not have any impact on
itsperformance.
• Cleantheinnerhousingusingahotdetergentsolutiononly(never
usecausticdetergents,abrasivepowdersorbrushes).
Fig. 4
N1 N2 Q1
Q2

40
Carbon filter
• The activated carbon filter should only be used if you want to use the
hoodin its filtering function.
• To do this you will need an original AEG activated carbon filter (see
special accessories).
•Cleaning/replacing the carbon filter
Theactivatedcarbon filter must normally be replaced at leastonce
every6months.Thisfiltercannotbewashedorregenerated.To
guaranteeproperabsorptionofodourstheworking volume ofthe
activated carbon must be proportionate to the hood air flow. In this
casethehigh quality of the activated carbon will ensureefficient
odourremovalforapproximatelyoneyear, assuming that the hood is
used normally. For this reason you should always use original AEG
filters only, making sure they are replaced when necessary.
•Mounting
Pulloutthedrawer.
Removethe grease filters, open the lamp cover support.
Fit the activated carbon filter so that it covers the grilles protecting
thehoodmotorandfan.
Turnthecarbon filter handle in a clockwise direction.
Repeatthe above operations for the secondactivatedcarbonfilter.
Replacethegreasefiltersandthelamp cover support.
•To dismount proceedinreverse order.
• Alwaysspecifythehood model code number and serial number
whenordering replacement filters. This information is shown on the
registration plate located on the inside of the unit.
• TheactivatedcarbonfiltercanbeorderedfromtheAEGtechnical
assistanceservice.
Fig. 5

41
Warning
• Failuretoobservethe instructions on cleaning the unit and changing
the filters will cause a fire hazard. You are therefore strongly
recommendedtofollowtheseinstructions.
• Themanufacturerdeclinesallresponsibilityforany damage to the
motoror any fire damage linked to inappropriate maintenance or
failureto observe theabovesafetyrecommendations.
Changing the light bulb
• Disconnect the unit from the mains power supply.
• Pulloutthedrawer.
• Openthe lamp cover support.
• Replace the old light bulb with a new light bulb of the same kind.
• Replacethe lamp cover support.
• If the light does not come on, make sure the bulb has been screwed
in correctly before contacting the technical assistance service.
Fig. 6

42
Cleaning
• Warning: always disconnect the hood from the mains power supply
beforecleaning it.
Neverinsertpointedobjectsinthemotor’s protective grid.
• Washtheoutsidesurfaces using a delicate detergent solution. Never
usecausticdetergentsorabrasivebrushesorpowders.
• Only ever clean the switch panel and filter grille using a damp cloth
anddelicate detergents.
• It is extremely important to clean the unit and change the filters at
therecommendedintervals.Failure to do so will cause grease
deposits to build up that could constitute a fire hazard.
Special accessories
Carbonfilter TYPE 303 E-Nr.942 120 309
Technical assistance service
You are welcome to telephone our technical assistance service (see list
oftechnicalassistancecentres)wheneveryouneed information or in the
unlikelyeventofafault.
When calling, please be ready to specify:
1. The model code number
2. The serial number (E-Nr.)
3. The manufacturing number (F-Nr.)
This information is shown on the registration plate inside the unit
behind the grease filter.
We reserve the right to change specifications and colours as a result of
ourpolicy of continuing technological development.
Table of contents
Other AEG Ventilation Hood manuals


