Action S002475 User manual
Magnetic Rowing Machine
S002475
Instruction Manual

2S002475 Magnetic Rowing Machine
Contents
3Warnings
5Installation Instructions
6Care and Maintenance Instructions
7Safety Information
10 Basic Skills
12 Basic Landing Positions
14 Parts List
15 Assembly Instructions
22 Inspection Check List
23 Warranty Information
3S002475 Magnetic Rowing Machine
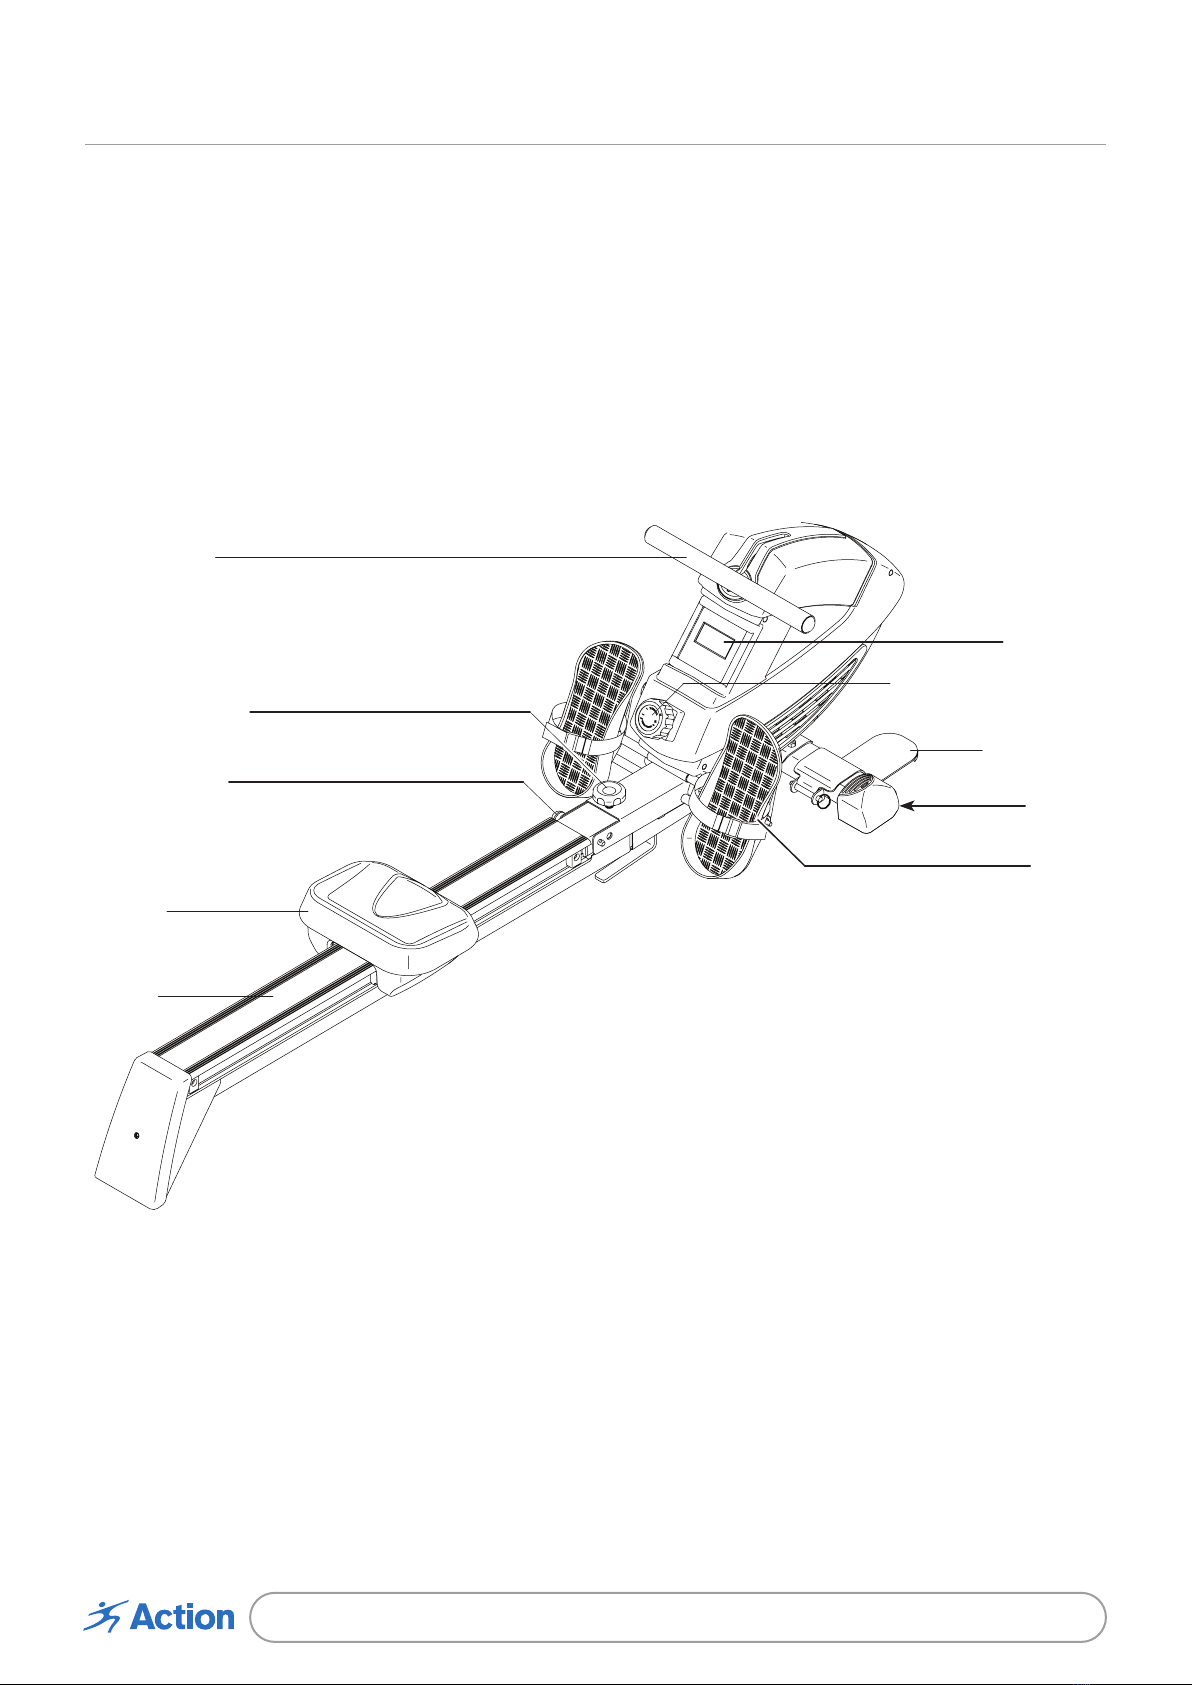
Foot Plate
Wheel
Pedal
Seat
Console
Resistance Control
Frame Pin
Frame Knob
Rail
Row Bar
Getting Started
Before you begin to assemble the product, remove all the parts from the packaging and
check that you have every part from the parts list on page 6 and 7. If you are missing
any parts please call our Service Centre on 1800 465 070. Once you have checked all the
parts, please read through the instructions again carefully and then you are ready to get
started. Ensure you assemble the Rowing Machine on a level surface and check that all
the hardware is fitted tightly before use.
4S002475 Magnetic Rowing Machine
Warnings
To reduce the risk of serious injury, read the entire manual before you assemble or
operate this rowing machine. In particular, please note the following safety precautions.
Please keep this manual in a safe place for future reference. Any defective components
should be replaced or repaired immediately and the rowing machine should not be used
until the repair has occurred.
WARNING: It is strongly recommended that you consult your physician prior to
beginning an exercise program. If dizziness, nausea, chest pains, or any other
abnormal symptoms are experienced while using this rowing machine, stop the
workout at once and consult a physician immediately.
1. It is the responsibility of the owner to ensure that all users of this rowing machine
are adequately informed of all warnings and precautions. This rowing machine is not
intended for use by persons with reduced physical, sensory or mental capabilities;
or lack of experience and knowledge unless they are being supervised by the person
responsible for their safety.
2. Keep children and pets away from this rowing machine at all times.
3. This rowing machine is not suitable for persons under the age of 15.
4. The maximum user weight for this rowing machine is 120kg, Class HC, speed-
independent system.
5. This rowing machine should be assembled by an adult. During assembly, keep
children away from the work area as this rowing machine contains small parts that
may cause a choking hazard.
6. Only use this rowing machine as described in this manual.
7. Place this rowing machine on a level surface with at least a 2m diameter of clear
space surrounding the unit. To protect your floor, it is recommended that you place an
anti-slip mat underneath the rower.
8. Keep the rowing machine indoors, away from moisture and dust. Do not put the
rowing machine in a garage, outbuilding, covered patio or near water.
9. Never allow more than one person to use the rowing machine at any time.
10. Always examine your rowing machine before use to ensure all parts are in working
order and all of the hardware is fitted tightly.

5S002475 Magnetic Rowing Machine
11. Always wear appropriate exercise clothing when using the rowing machine, do not
wear loose clothing that could become caught. Always wear appropriate running
shoes; never use the rowing machine with bare feet, wearing only stockings/socks or
in sandals.
12. Care must be taken when liing or moving the rowing machine, to ensure you don’t
injure your back. Always use proper liing techniques.
13. Always keep your back straight while using the rower, do not arch your back.
14. Do not release the row bar while the cord is extended.
15. Care should be taken when getting on and off the Rowing Machine. To get onto the
machine, stand on the le side and ensure the le pedal is in the lowest position. Grip
the handle bars, place your le foot onto the le footplate and li yourself onto the
machine, stabilizing yourself by gripping the stationary handles. Once you feel stable
and secure, li your right foot over the machine and place it on the right foot plate.
Before starting any movement, stand tall, brace your midsection and balance yourself.
Start moving by pedaling the legs and moving the arms back and forth in time with
the legs. As you push down with your right leg, pull back with your right arm and vice
versa. Keep your eyes forward and upper body upright throughout the movement. To
get off your rowing machine you must first slow down until the machine comes to a
complete stop. Then remove yourself in the same manner you got onto the machine.
Warnings (cont)
6S002475 Magnetic Rowing Machine
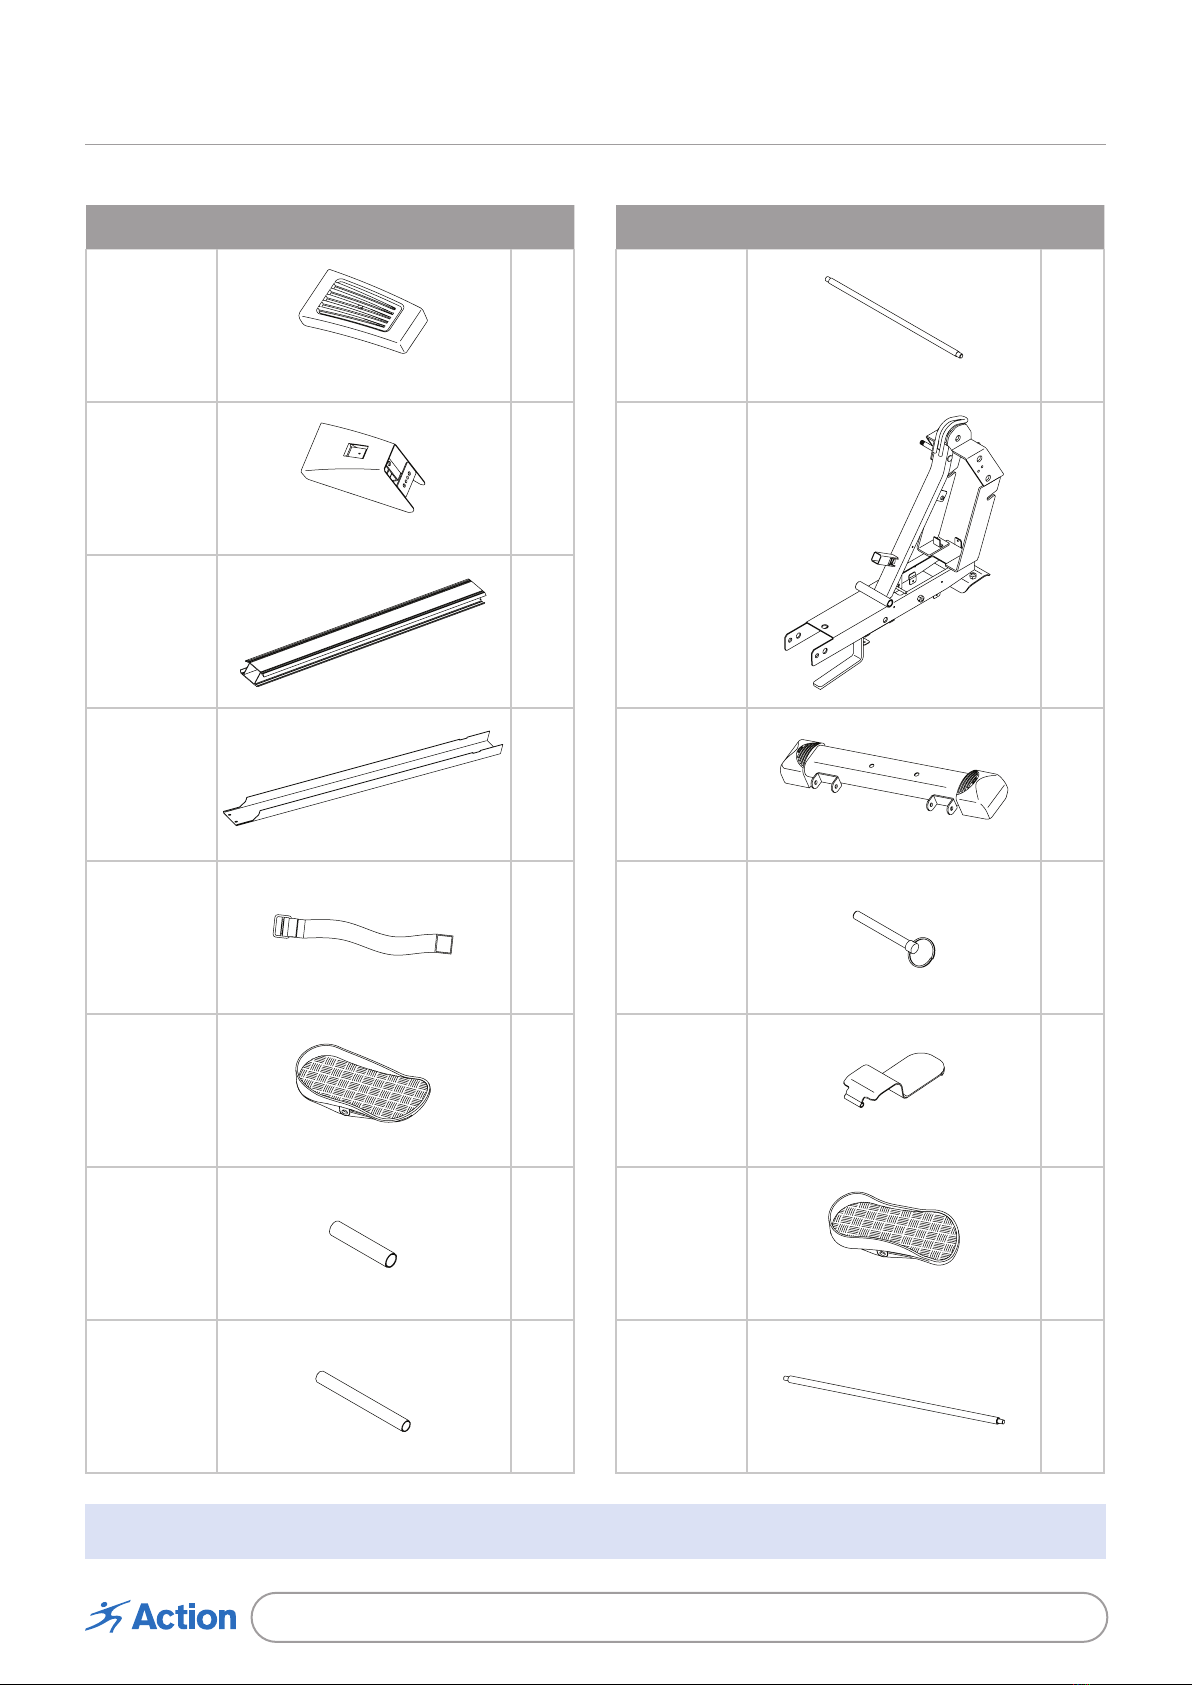
Part No. Description Qty
2 Rear Stabiliser Cover 1
3 Rear Stabiliser 1
8 Rail 1
18 Rail Cover 1
29 Pedal Strap 2
30 Right Pedal 1
32 Pedal Spacer 2
34 Pedal Stop 2
Part No. Description Qty
35 Stop Rod 1
39 Frame 1
50 Front Stabiliser 1
51 Foot Plate Pin 2
52 Foot Plate 2
57 Le Pedal 1
58 Pedal Axle 1
NOTE: Some parts may be supplied pre-assembled.
Parts List
7S002475 Magnetic Rowing Machine
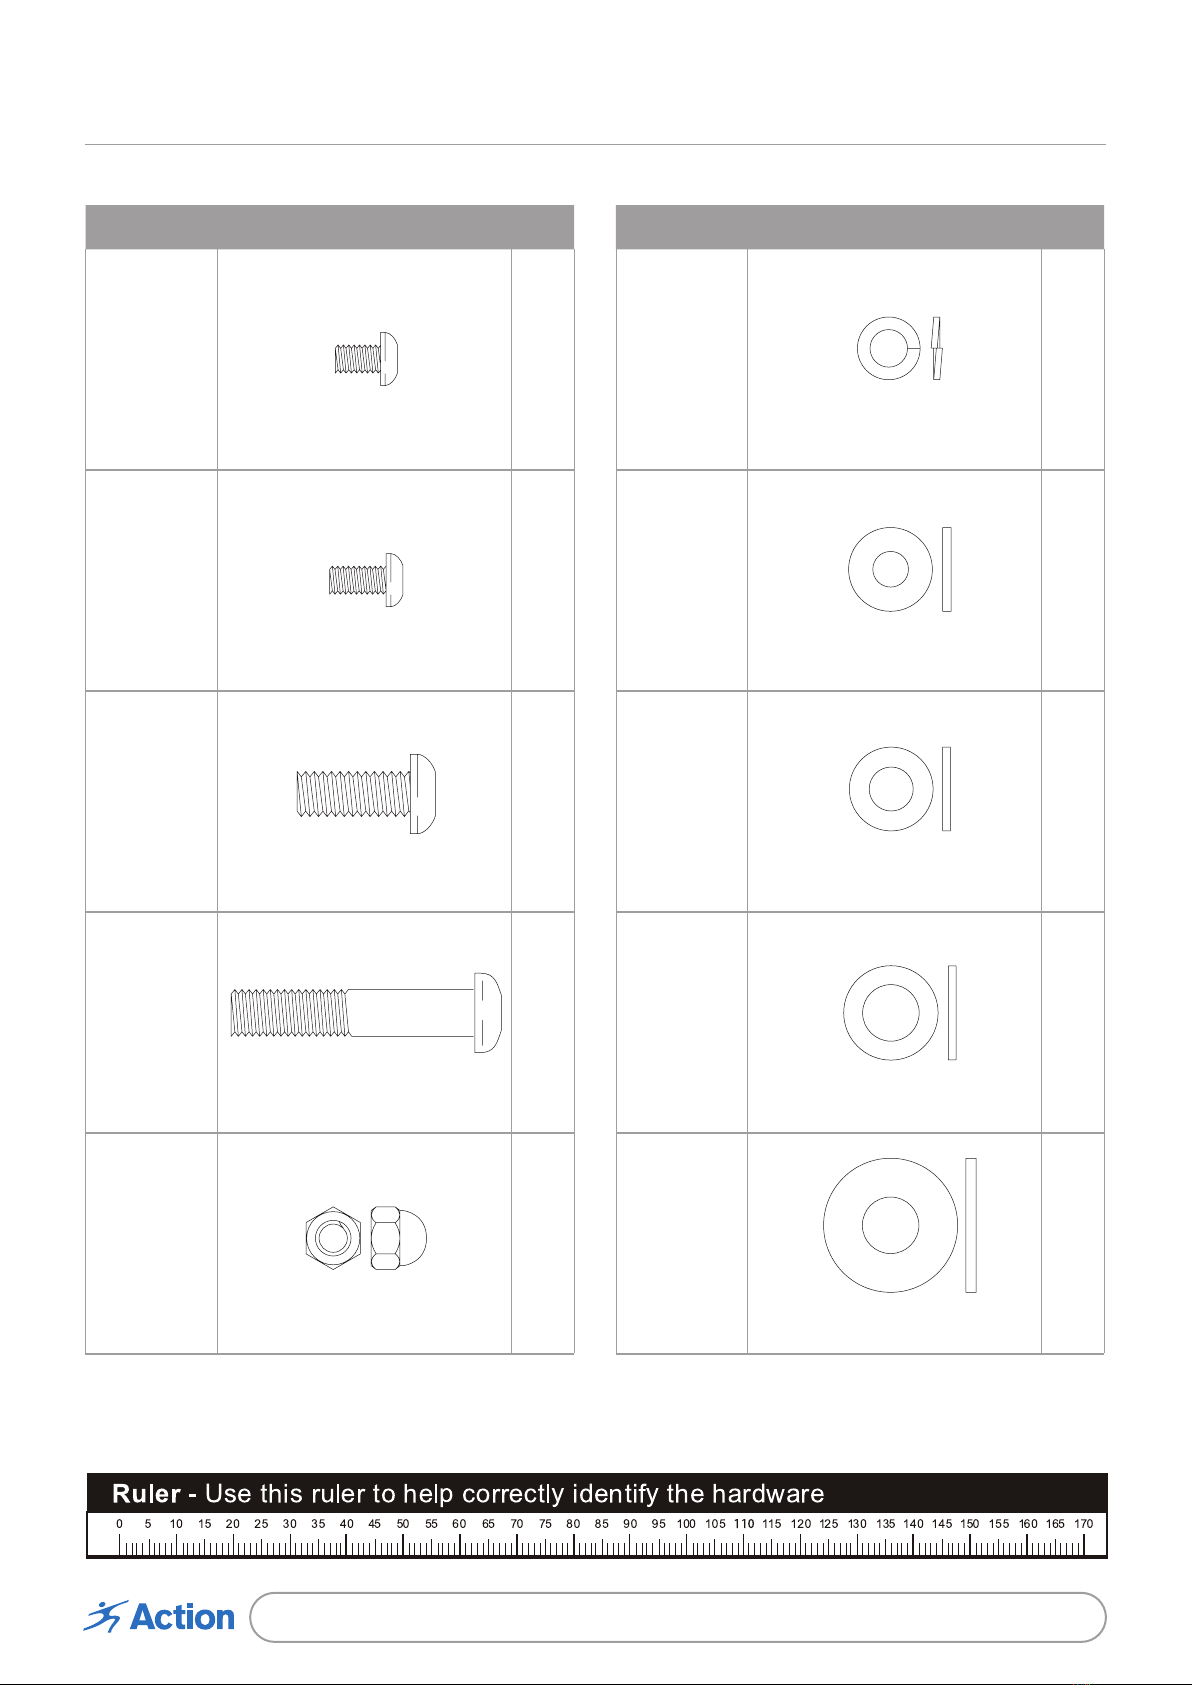
Hardware
Part No. Description Qty
12 M5 x 8mm Screw 4
101 M5 x 10mm Screw 1
14 M8 x 20mm Screw 2
46 M10 x 52mm Screw 2
31 M8 Acorn Nut 4
Part No. Description Qty
15 M8 Split Washer 4
16 M8 x 20mm Washer 6
47 M10 x 20mm Washer 2
33 M13 x 22mm Washer 2
88 M13 x 32mm Washer 1

8S002475 Magnetic Rowing Machine
50
39
47
47
46
46
45
39
36
37 54
33
33
Assembly Instructions
Find a clean flat surface to unpack and assemble your rowing machine. Prior to beginning
assembly, ensure that you have all of the parts listed in the Assembly Parts List and
Hardware Identification Chart.
If you’re missing any parts, please contact our Service Centre on 1800 465 070 or email
service@actionspares.com.au to arrange for replacement parts to be sent to you.
Step 1
Attach the Front Stabiliser (50) to the
Frame (39) using M10x52mm Bolts
(46) and M10x20mm Washers (47).
Step 2
Remove the Frame Pin (37) from the
Frame (39). Unwrap the Cord (45)
from the Frame (39).
Remove 1/2” Locknut (54),
M13x22mm Washers (33) and
1/2”x100mm Bolt (36) from the
Frame (39).
NOTE: The parts that you
removed will be used in later
steps.

9S002475 Magnetic Rowing Machine
41
8
8
28
8
39
54
33
33
36
55
9
10
11
Step 3
Remove the M6x12mm Bolt (9), Carriage Bumpers (10) and Frame Bushing (11) which are
pre-assembled on the rear end of the Rail (8).
Slide the Seat (28) onto the rail and assemble the removed M6x12mm Bolt (9), Carriage
Bumpers (10) and Frame Bushing (11) at the end of the rail.
Assembly Instructions (cont)
Step 4
Attach the Rail Bracket (41) located at
the front of Rail (8) to the Frame (39)
using 1/2”x100mm Bolt (36), M13x22mm
Washers (33) and 1/2” Locknut (54) that
were removed in Step 2.
Cover 1/2” Locknut (54) with Nut Cap (55).

10 S002475 Magnetic Rowing Machine
Hole
8
8
28
3
41
37
14
14 16
16
Step 5
Move the Seat (28) to the front of
the Rail (8).
Raise the Rail (8) to the vertical
position and insert the Frame
Pin (37) into the hole on the Rail
Bracket (41), so that it holds the
Rail (8) in place.
Step 6
Attach the Rear Stabiliser
(3) to the Rail (8) using
M8x20mm Bolts (14) and
M8x20mm Washers (16).
Assembly Instructions (cont)
Other Action Home Gym manuals


