a2b Hybrid/24 User manual
Hybrid/24 owner’s manual


Content
1.0 Introduction
2.0 Important Information
3.0 Your A2B
4.0 Understanding your A2B
5.0 Battery use, storage and disposal
6.0 Important Pre-ride Safety Information
7.0 Maintenance
8.0 Cleaning your A2B
9.0 Trouble Shooting
10.0 Technical Information
11.0 Warranty & Security Details
12.0 Disposal
Owner registration
p. 2
p. 3
p. 4
p. 10
p. 19
p. 25
p. 28
p. 34
p. 35
p. 36
p. 37
p. 38
p. 39
Owners manual

2
Owners manual
1.0 Introduction
Welcome and congratulations on buying your new A2B Hybrid*, the electric bike that’s taking transport in a whole new direction.
Your bike will give you the freedom to go your own way.
It’s the new revolutionary way to get to work, pop to the shops or just get some fresh air.
Compared to jumping in the car, it’s a lot more fun, easier to park and will reduce your fuel costs as well as your impact on the
environment... as you’ll soon find out!
Hero Eco Ltd
80 Coleman St
London EC2R 5BJ
www.wearea2b.com
*’A2B Hybrid is termed as ‘A2B’ throughout the rest of this manual.

Owners manual
3
Important symbols
This indicates a potentially hazardous situation which, if not avoided, could result in a serious injury,
property damage or damage to equipment or inadvertent system failure.
Provides helpful or other important related information.
If you have any questions or are not sure about any instructions in this owner manual ask your A2B dealer.
2.0 Important information
This owner`s manual contains important safety, performance and service information.
Please ensure you read this thoroughly before your first ride.
Your A2B should be fully assembled and the battery charged by your A2B dealer at the time of delivery.
If not contact us immediately as this will void your warranty.
Please ensure that all users of your A2B read and understand the following important information.
• According to national rules a bicycle has to be equipped with
two independently working brakes, a bell, head light, tail light,
side reflectors on the wheels or integrated reflection stripes
on the tyres and front and rear reflectors.
• The A2B is designed for public road use. Don‘t ride off-road,
in water and don‘t use the A2B to jump in bumpy terrain or for
competition events.
• We recommend that you always wear an approved
cycle helmet at all times and light or fluorescent
clothing at night when riding the A2B.
• Make sure you know and practice the rules of safe and
responsible riding. There is always a risk of serious / fatal
injury or damage as a result of an accident while riding an
A2B. By choosing to ride the A2B you assume
responsibility for that risk.
• Your existing insurance policies may not provide
accident cover for your A2B. Contact your insurance com-
pany or agent for information.
• This owner’s manual makes no representation about the
safe use of the A2B under all conditions.
4
Owners manual
3.0 Your A2B
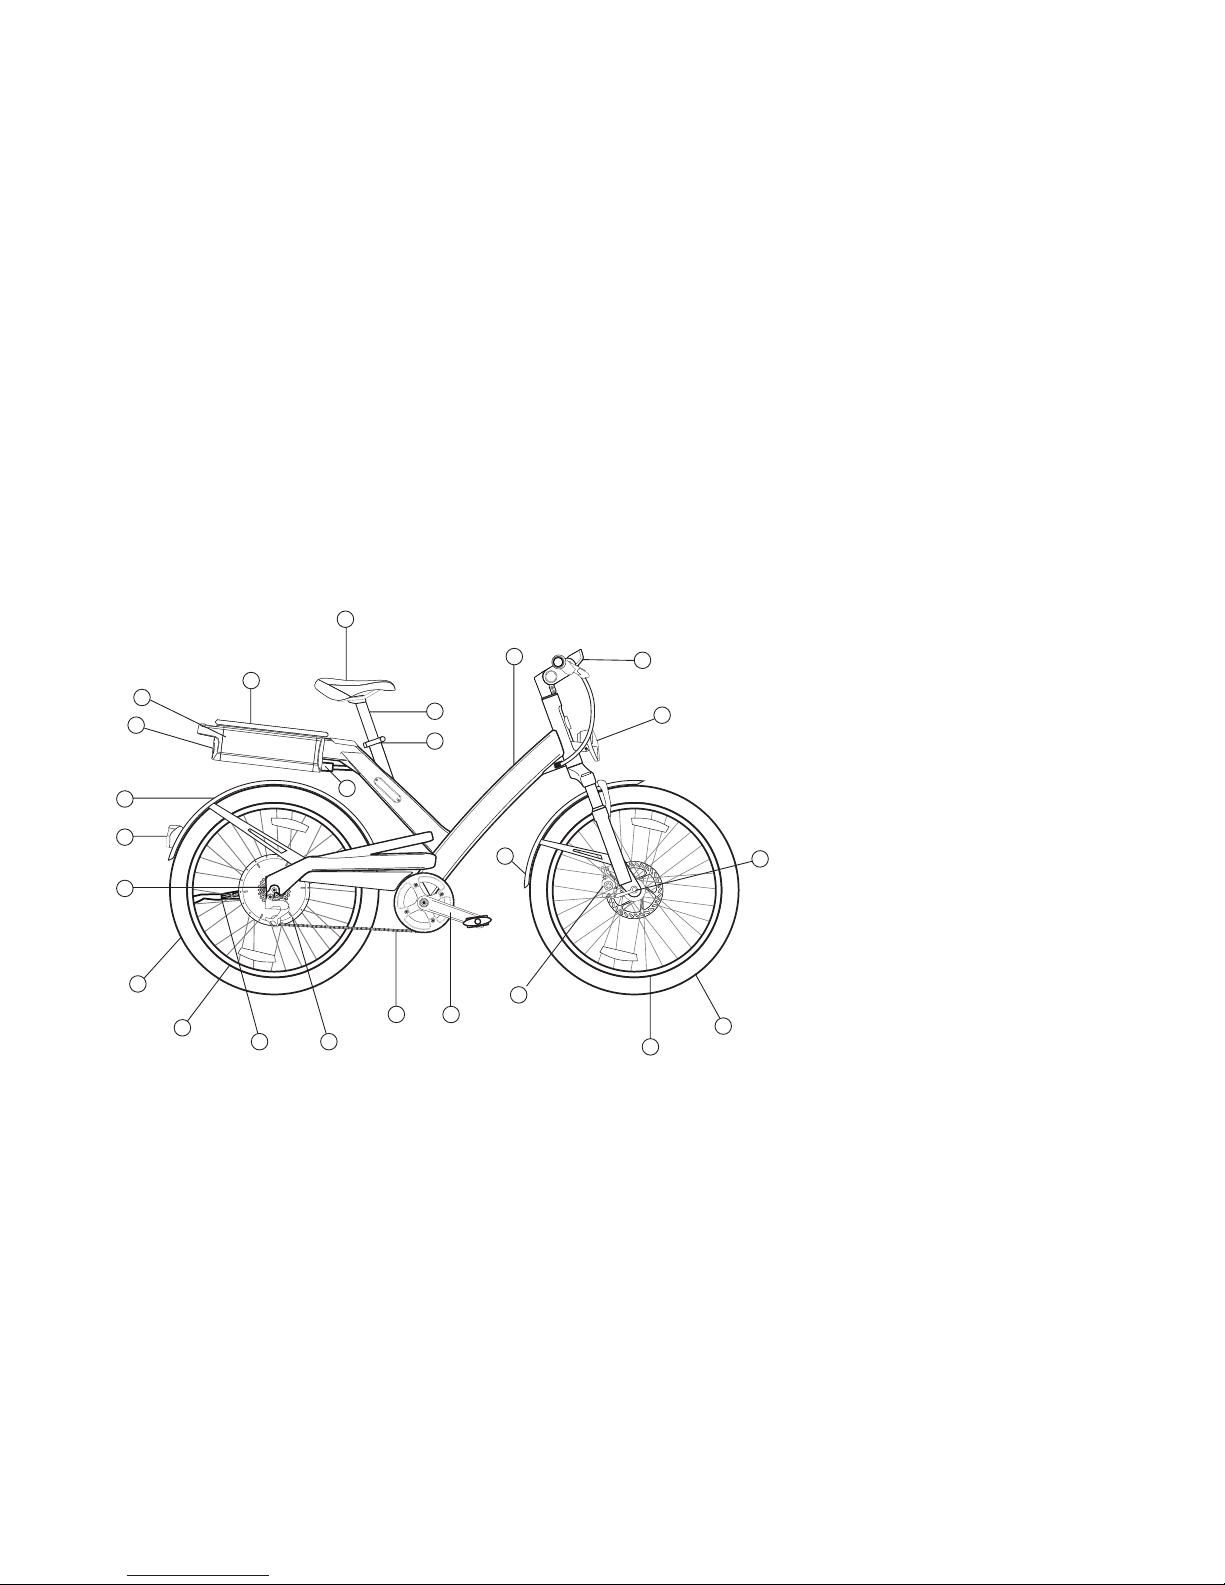
3.1 Components
1
2
3
23
5
6
8
18
10
9
13
12
14
11
16
15
17
19
20
24
21
7
4
22
1. Saddle (seat)
2. Seat post
3. Seat post quick release
4. Front mud guard
5. Front wheel tyre
6. Front wheel rim
7. Front disc brake and rotor
8. Pedal, crank arm and chain ring
9. Drive chain
10. Motor
11. Kickstand
12. Rear wheel rim
13. Rear wheel tyre
14. Derailleur and freewheel
15. Rear light
16. Rear mud guard
17. Reflector on battery
18. Battery
19. Rear rack
20. Battery plug
21. Frame
22. Display
23. Headlight
24. Quick release
Owners manual
5
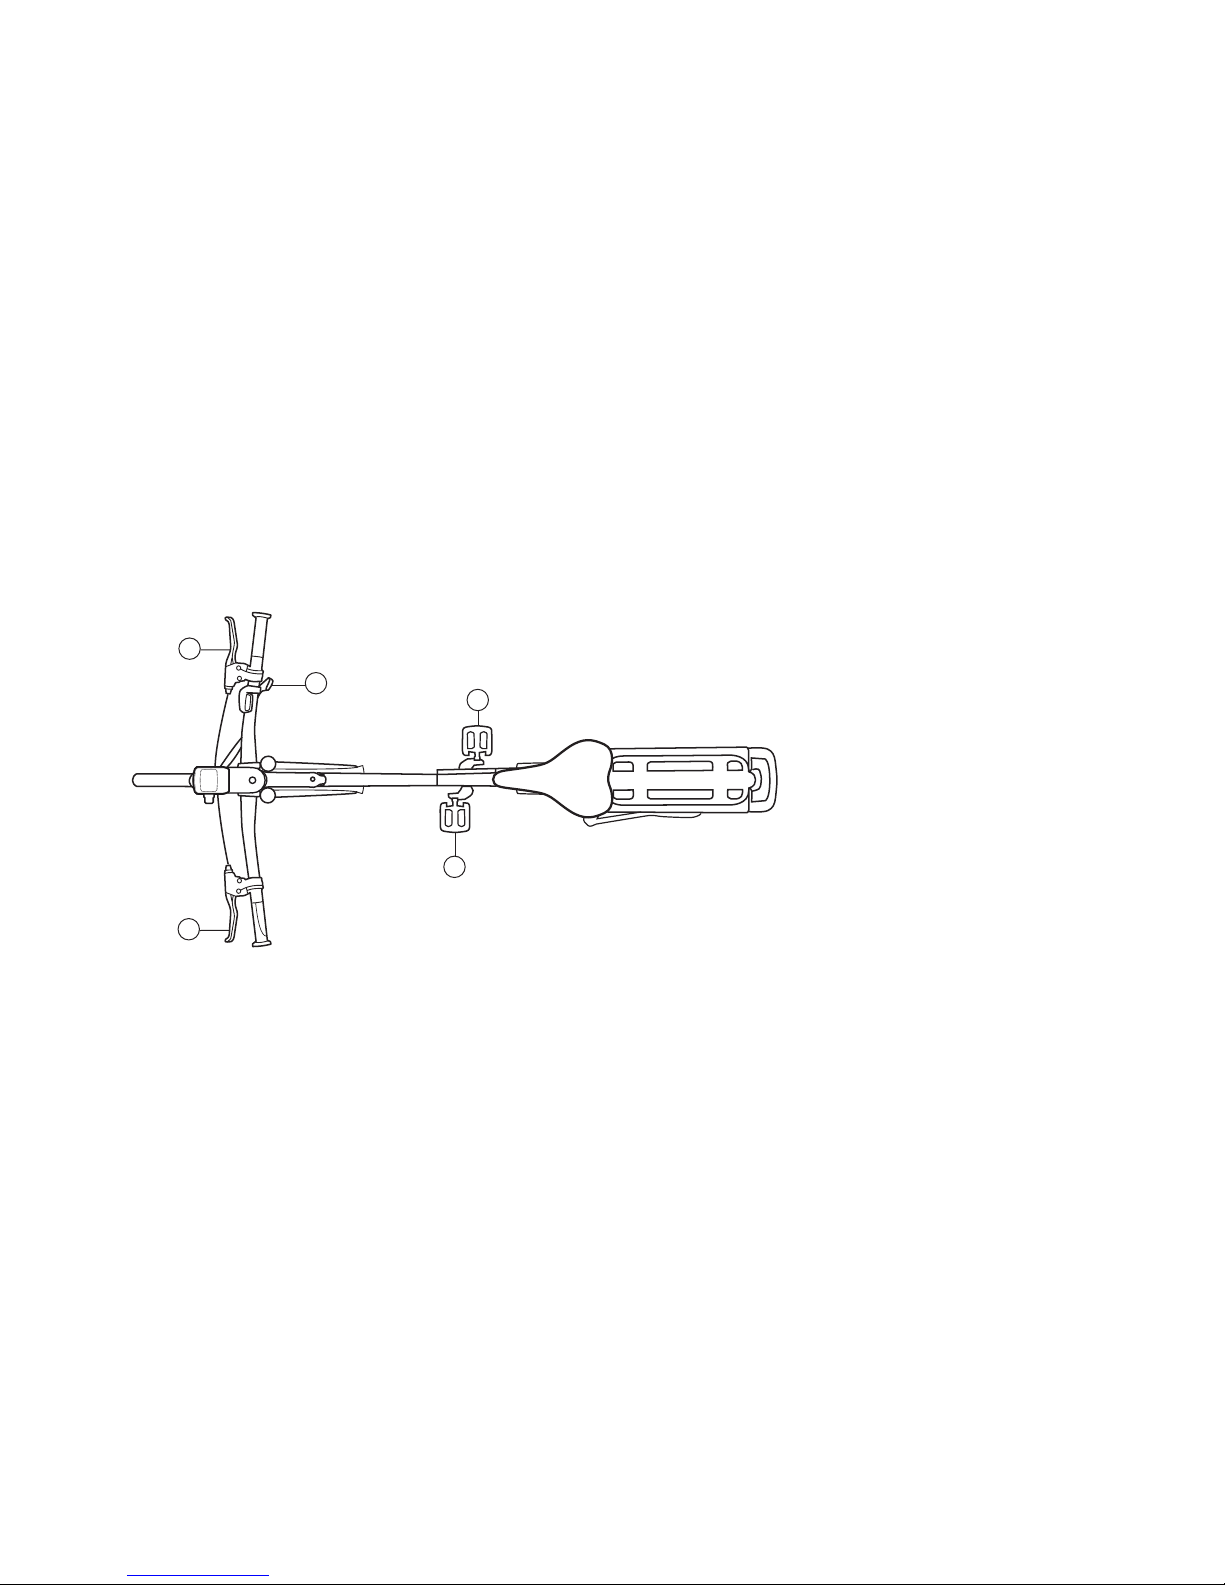
3.1 Components
A
B
C
E
D
A. Right brake lever
(operates rear brake)
B. Left brake lever
(operates front brake)
C. Gear shifter
D. Right pedal
E. Left pedal

6
Owners manual
3.2 Changing components or adding accessories
Before installing any component or accessory, including a
different tyre, make sure that it is compatible with your A2B by
checking with your A2B dealer.
Read, understand and follow the instructions that accompany
the component or accessory you purchase for your A2B. Fol-
low the component manufacturer’s instructions if they conflict
with these instructions.
As with all mechanical components, the bicycle is subject-
ed to wear and high stresses. Different materials and compo-
nents may react in different ways to wear or stress fatigue. If
the design life of a component has been exceeded, it may sud-
denly fail possibly causing serious or fatal injuries to the rider.
Any form of crack, scratches or change of colouring in highly
stressed areas, such as frame, fork and handle bar, indicates
that the life of the component has been reached and it should
be replaced immediately by an A2B dealer.
Failure to confirm with compatibility, proper installation,
operation and maintenance components or accessories
can result in serious or fatal injury.
Using non-genuine components or replacement parts may
compromise the safety of your A2B and void the warranty.
If you change components or add accessories, you do
so at your own risk because A2B may not have tested that
component or accessory for compatibility, reliability or safety
on your A2B.
3.3 Brake lever adjustment
Can you comfortably operate the brakes? If not, take your A2B
to an A2B dealer and ask them to adjust the angle of the brake
levers.
Alternatively, follow the instructions below to adjust the brake
lever angle:
1. Loosen the bolt underneath the brake lever with an
appropriate allen key.
2. Adjust the angle to suit.
3. Tighten up the bolt underneath, ensuring the brake lever is
firmly fixed in place.
Should you need to adjust the brakes themselves, please
take your A2B to an A2B dealer to make the required adjust-
ments.

Owners manual
7
Frame Height
Frame Height
Inside Leg Height
Frame Height
1 inch / 2,5 cm
Clearance
Inside Leg Height
3.4 Seat height adjustment
The seat height may require adjustment. Ask your A2B dealer
to adjust it before you ride, however to adjust the seat yourself
follow these instructions:
To determine the correct height of the seat for the rider
1. Straddle the assembled A2B with your feet
shoulder-width apart and flat on the ground.
2. There must be at least 25 mm/1 inch clearance between the
frame height (1) and the inside leg measurement of the rider (2).
Height adjustment
1. Release the seat post quick release by rotating the quick
release lever away from the seat post until it is fully open.
2. Adjust the saddle height accordingly to your request. DO
NOT raise the seat beyond the ‘minimum insertion’ mark on the
seat post.
3. Firmly grip the seat tube with your hand, and push the lever
over to the closed position towards the frame, ensuring that it
does not protrude so as to cause injury to the rider. The lever is
securely tightened when it takes a significant amount of force
to position it in the closed position. The appropriate amount of
force necessary to close the lever when it is properly adjusted
will result in an imprint of the lever in the palm of your hand.
When properly closed, it is impossible to move unless you
open it again by reversing the steps above. If you can easily
move it, open the quick release lever and tighten the adjusting
nut another 180º and try again.
5. Ensure the seat clamp bolt (seat pillar - seat post) is tight-
ened to 27 Nm.
4. After adjustment, ensure there is no movement in the seat
position in any direction.
Failure to correctly secure the seat can result in serious or
fatal injury.
• This owner’s manual makes no representation about the safe
use of the A2B under all conditions.
8
Owners manual
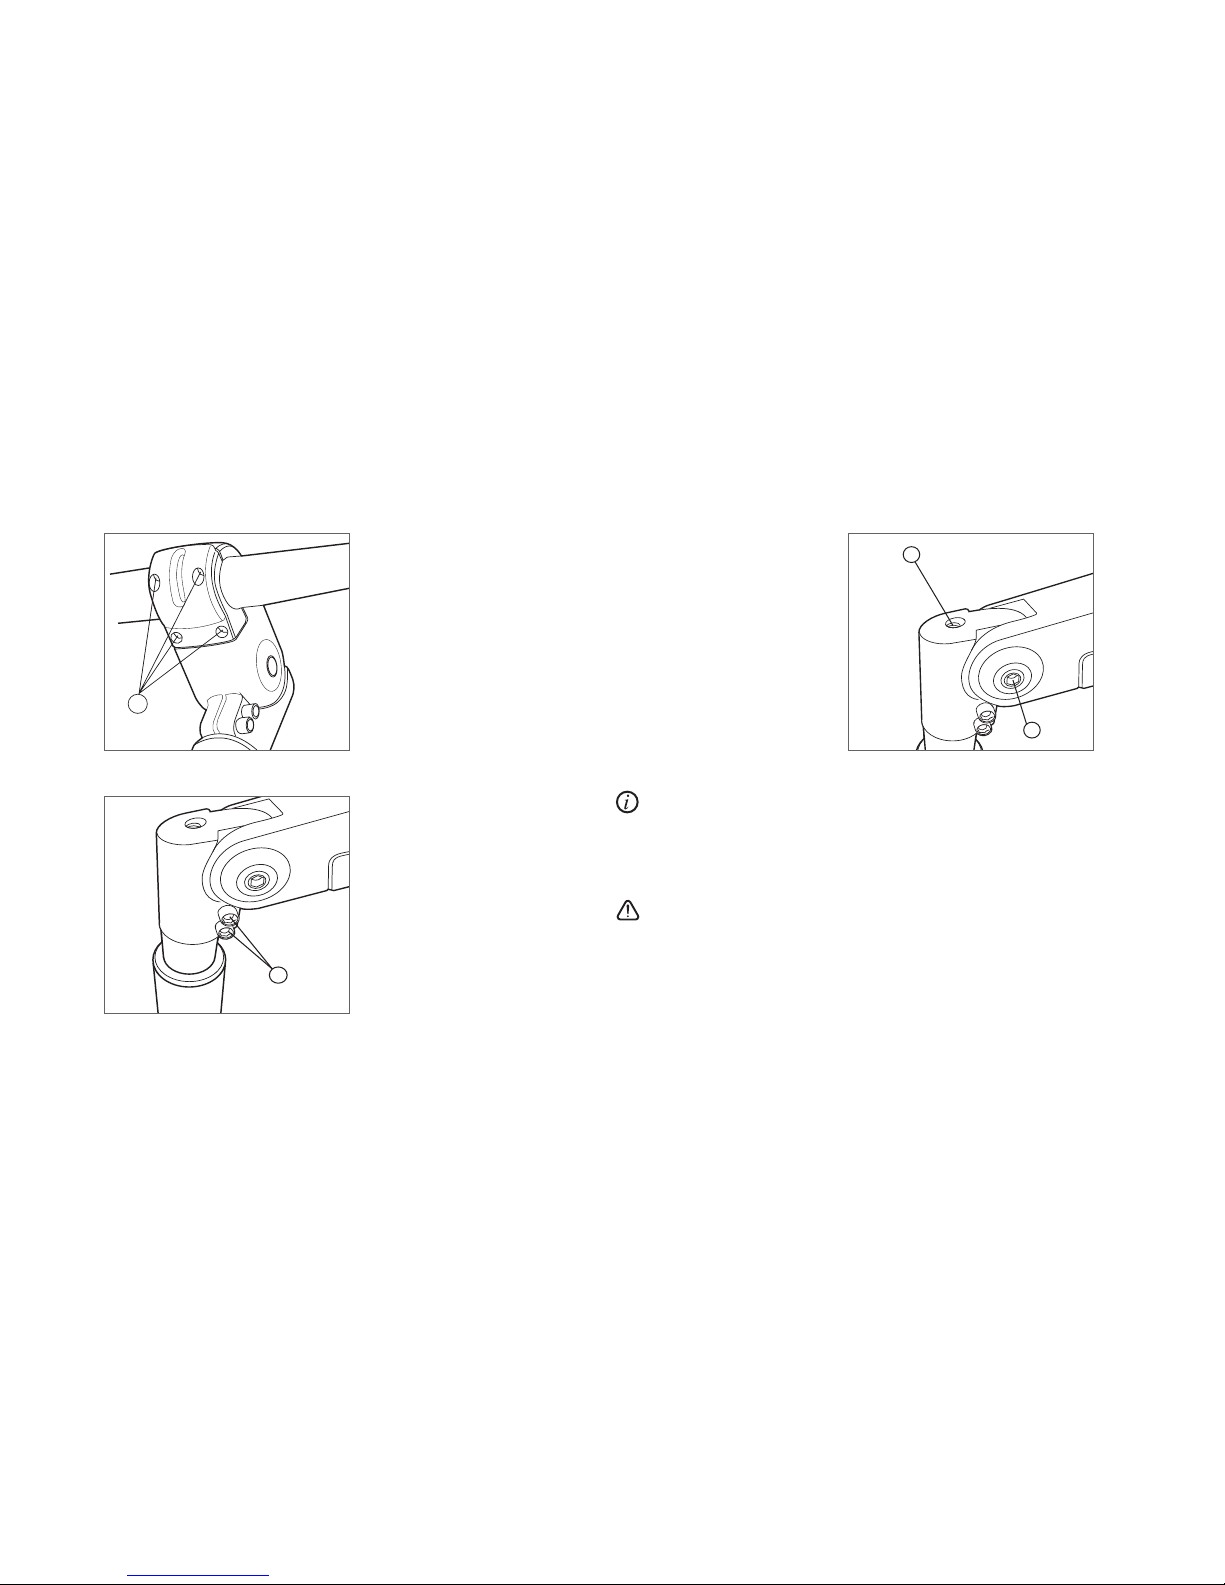
3.5 Handle bar adjust-
ment
1. Loosen the bolts A using
an appropriate allen key.
2. Position the handle bar
symmetrical to the bar stem.
3. Turn the handle bar to the
desired angle.
3. Tighten the bolts
consistently to 5 Nm.
3.6 Bar stem adjustment
Bar stem alignment
1. Loosen the bolts B using
an appropriate allen key.
2. Once loose, align the stem
with the front wheel.
3. Once aligned, tighten the
bolts consistently to 15 Nm.
Bar stem angle adjust-
ment
1. Loosen bolt C using an
appropriate allen key.
2. Position the stem to the
desired angle.
3. Tighten bolt C to
17-18.5 Nm ensuring the
stem is aligned to the front
wheel.
Caution: this is an A-head stem, the top screw D is
preloaded with 1-2 Nm and does not adjust the handlebar
stem. Trying to tighten bolt D can damage the head set bear-
ings.
Failure to correctly secure the bar stem can result in
serious or fatal injury.
Ensure there is no play in the steering and that the steering is
working smoothly.
Should you need further advice to adjust the headset, please
contact your A2B dealer.
A
B
C
D
Other manuals for Hybrid/24
1
Table of contents
Other a2b Bicycle manuals