5.11 Tactical SURESHOT HRT User manual

HRT WATCH

WWW.511TACTICAL.COM
2
CONTENTS

WWW.511TACTICAL.COM
1
CONTENTS
Overview
• Functions ...............................................Page 2
• Basic navigation .........................................Page 3
Analog Functions
• Time setting .............................................Page 4
• Bezel Timer operation ..................................... Page 5
Digital Time Functions
• Back-Light .............................................. Page 6
• Home Time setting ........................................ Page 7
• Calendar setting ......................................... Page 8
• Time Zone 2 setting ....................................... Page 9
• Alarm setting and operation . . . . . . . . . . . . . . . . . . . . . . . . . . . . . . . Page 10
• Chronograph (stopwatch) operation . . . . . . . . . . . . . . . . . . . . . . . . Page 11
• Timer setting and operation . . . . . . . . . . . . . . . . . . . . . . . . . . . . . . . . Page 12
Long Range Shooting Primer .................................. Page 13
Sureshot®
• Intro .................................................... Page 16
• Functions ............................................... Page 18
• Operations .............................................. Page 21
Watchband
• To Change or Replace Watchband . . . . . . . . . . . . . . . . . . . . . . . . . . Page 22
Warranty and Service ........................................ Page 23
Warranty Claim Form ........................................ Page 27
WWW.511TACTICAL.COM
2
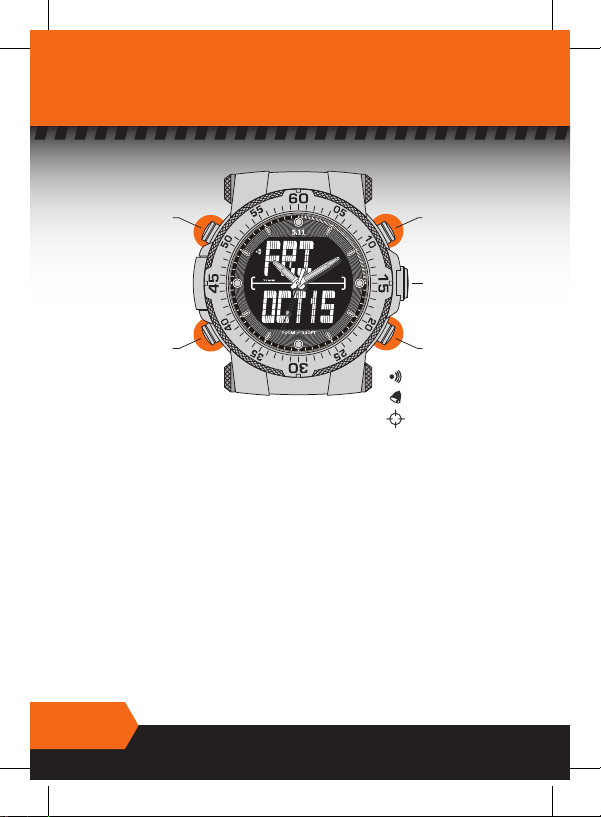
5.11® HRT® WATCH FUNCTIONS
PLUS (+)
SCREW
DOWN
CROWN
SELECT
SET
MINUS (-)
Hourly Chime Icon
Alarm ON Icon
Shooter Mode Icon
ANALOG FUNCTION :
• ANALOG time (three hands)
• BEZEL time (60 minutes)
DIGITAL FUNCTIONS:
Press SELECT to scroll through the following function displays:
• HOME TIME in 12 or 24 hour format with DAY, DATE, MONTH readout - Auto
calendar with 50 years coverage.
• T2 – Second time zone.
• ALARM - 2 alarms for HOME time and T2 time
• CHRONOGRAPH – Stopwatch with 1/100th sec readout.
• TIMER with alarm – Countdown in 1 sec readout from up to 24 hours.
SURESHOT® FUNCTIONS (DIGITAL):
• SURESHOT® Ballistic Calculator
Press SET in any mode to display TARGET RESULT screen
Press SELECT to scroll through fi elds.
WWW.511TACTICAL.COM
3
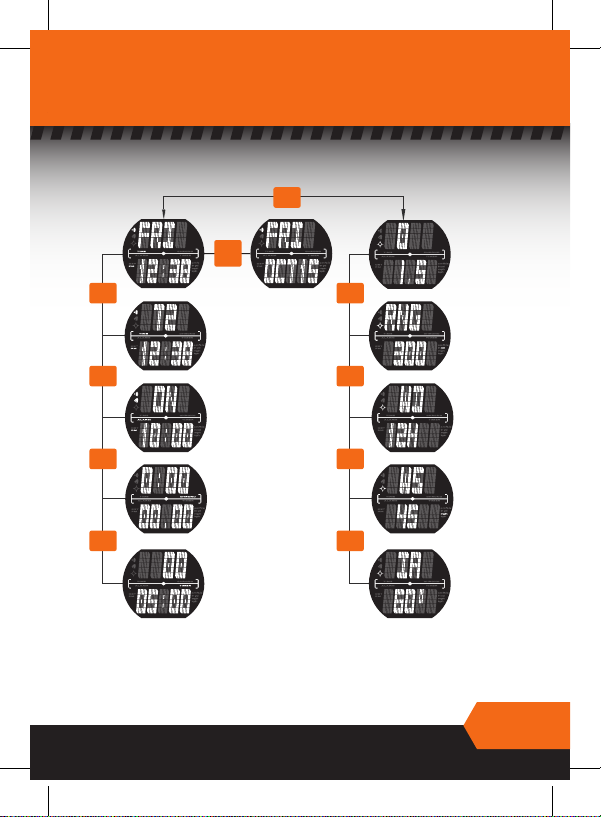
BASIC NAVIGATION
HOME TIME
TIME ZONE2
ALARM
CHRONO
TIMER
TARGET
(RESULTS)
WIND DIRECTION
RANGE
WIND SPEED
INCLINATION
ANGLE (0º ~ 60º)
DATE
(1H ~ 12H)
PRESS
SET
PRESS
SELECT
PRESS
SELECT
PRESS
SELECT
PRESS
SELECT
PRESS
SELECT
PRESS
SELECT
PRESS
SELECT
PRESS
SELECT
PRESS
& HOLD
SELECT
TIME FUNCTIONS SURESHOT® FUNCTIONS
WWW.511TACTICAL.COM
4
ANALOG FUNCTIONS
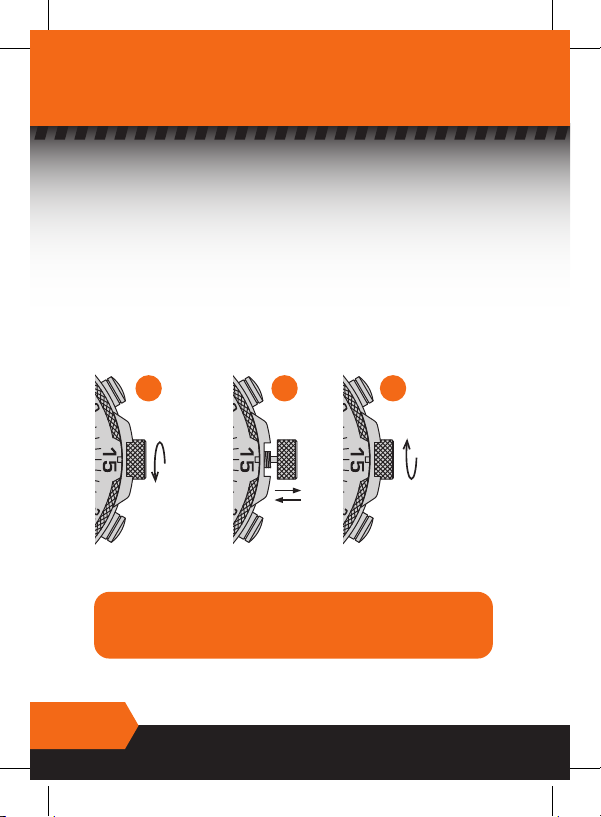
TIME SETTING
1. Make sure your watch is completely dry.
2. Turn the crown counter-clockwise (fi g. 1)
3. With crown completely unscrewed it can be pulled out to set your watch
(fi g. 2).
4. Turn the crown clockwise to move the hands to the correct time.
5. After setting the time, push the crown in and carefully screw the crown in to
reseal your watch. Never force the crown (fi g. 3).
ALIGN THREAD
CAREFULLY &
SCREW
CROWN FULLY
BUT CAREFULLY
UNSCREW
CROWN
IMPORTANT!
The crown must be fully screwed in for your watch to be
water resistant. Never unscrew the crown when your
watch is wet or in water.
fig. 3fig. 2fig. 1
WWW.511TACTICAL.COM
5
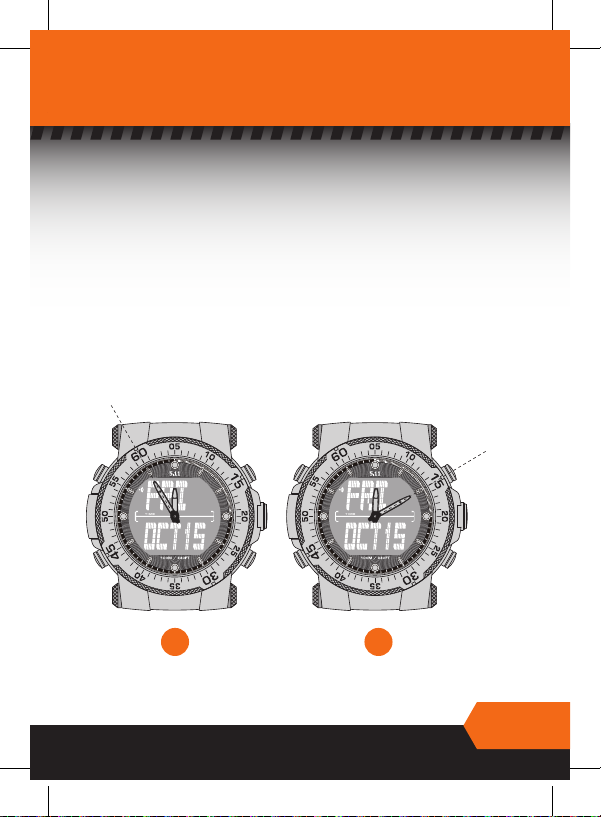
BEZEL TIMER OPERATION
Your watch is fitted with a uni-directional Bezel Timer. This bezel was
originally designed to be used for counting minutes when scuba diving but it
can be used as a timer for any purpose.
To set your bezel :
1. Turn your bezel by hand counter-clockwise and align the red marker at 60
with the minute hand (fig 1.)
2. As the minute hand moves, it will count up against the time on the bezel.
As long as the bezel is not moved, you can read the elapsed time (up to 60
minutes) by noting the minute hand’s position against the bezel. (Example
15 mintues as in fig 2.)
fig. 1 fig. 2
ALIGN
READ

WWW.511TACTICAL.COM
6
DIGITAL TIME FUNCTIONS
BACK-LIGHT
1. Press PLUS (+) and watch will illuminate for 10 seconds.
2. Press PLUS (+) again to immediately switch off the light.
(It is advisable to turn off the light whenever possible to conserve
battery life.)
WATCH MODE Screen default:
You may choose to have the main screen in DAY/MONTH/DATE or
DAY/HOME TIME display (for night operations).
In WATCH MODE, press and hold SELECT to toggle between the two
display options.
HOME TIME DATE
PRESS
& HOLD
SELECT
PLUS (+)SET
SELECTMINUS (-)
WWW.511TACTICAL.COM
7
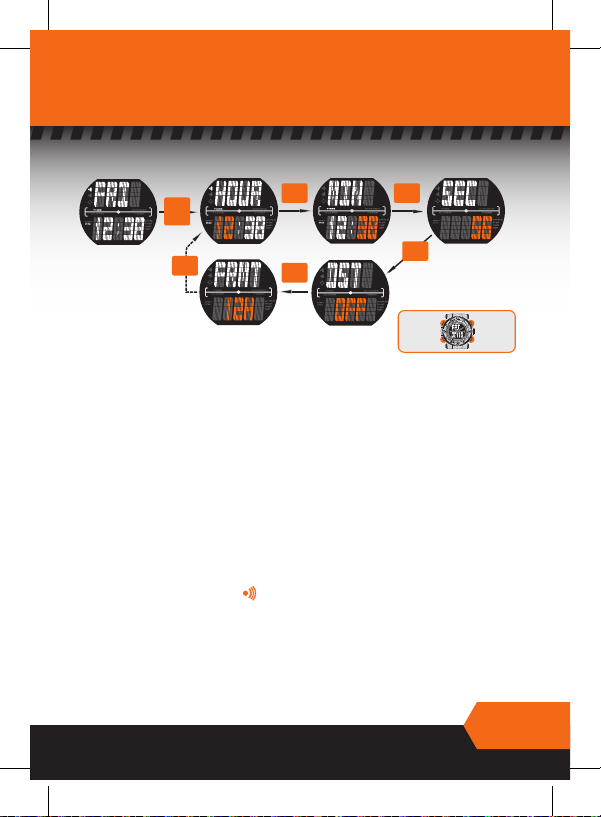
HOME TIME
SETTING :
1. In WATCH MODE - DAY/HOME TIME display, press and hold SET. Hour
digits will fl ash. (Day/Home time must be selected see page 6).
2. Select the hour by pressing PLUS (+) or MINUS (-).
3. Press SELECT. Minute digits will fl ash. Select the minute by pressing PLUS
(+) or MINUS (-).
4. Press SELECT. Second digits will fl ash. Press PLUS (+) or MINUS (-) to
synchronize the seconds with the analog hand at 0/60.
5. Press SELECT. DST (daylight savings time) digits will fl ash. Choose your
“summertime” preference by pressing PLUS (+) or MINUS (-).
6. Press SELECT. 12 hr/24 hr Format digits will fl ash. Choose your preferred
display by pressing PLUS (+) or MINUS (-).
7. Press and hold SET to leave setting mode.
8. Toggle the hourly chime ( ) on/off by pressing MINUS (-). The
hourly chime icon will appear at the left of the day display when chime
is activated.
PRESS
SELECT
PRESS
SELECT
HOME TIME HOUR MINUTE SECONDS
TIME FORMAT DST
PRESS
SELECT
PRESS
SELECT
PRESS
SELECT
PRESS
& HOLD
SET
PLUS (+)SET
SELECTMINUS (-)
WWW.511TACTICAL.COM
8
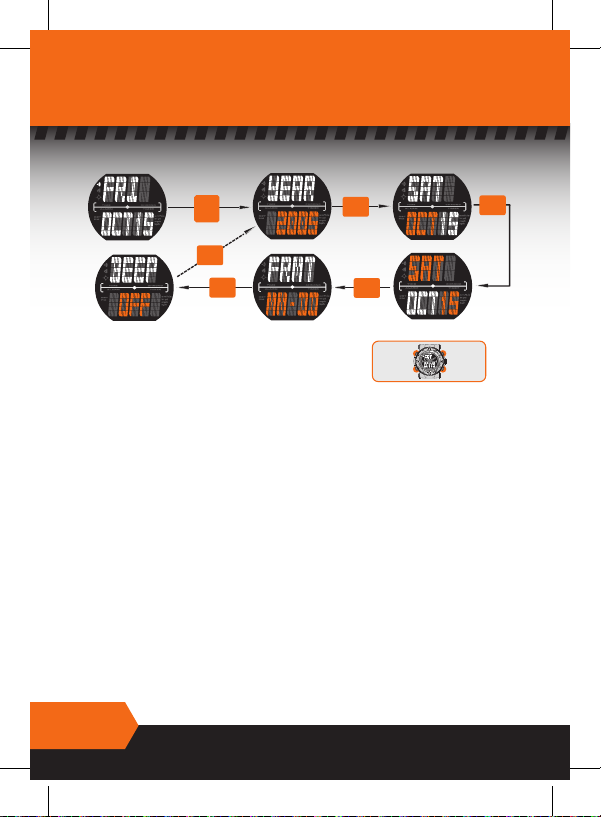
CALENDAR
DATE MODE YEAR MONTH
DAY/DATE
DATE FORMAT
BEEP SETTING
PRESS
SELECT
PRESS
SELECT
PRESS
SELECT
PRESS
SELECT
PRESS
SELECT
PRESS
& HOLD
SET
PLUS (+)SET
SELECTMINUS (-)
SETTING:
Day/Month/Date display must be selected. (see page 6)
1. In WATCH MODE (DAY/MONTH/DATE) display, press and hold SET. Year digits
will fl ash.
2. Select the year by pressing PLUS (+) or MINUS (-).
3. Press SELECT. Month digits will fl ash. Select the month by pressing PLUS (+)
or MINUS (-).
4. Press SELECT. Date digits will fl ash. Select the date by pressing PLUS (+) or
MINUS (-). (Correct Day will automatically be selected).
5. Press SELECT. Format digits will fl ash. Choose your preferred display by press-
ing PLUS (+) or MINUS (-).
6. Press SELECT. BEEP digits will fl ash. This fuction allows you to select a beep
to sound with every button push (default is off). Choose your preference by
pressing PLUS (+) or MINUS (-).
7. Press and hold SET to leave setting mode.
Table of contents


