UNITED VC8129 User manual

Model No: VC8129
Handheld vacuum cleaner
User Manual
Brief Introduction
Thanks for your purchase of our appliance.
It is a cordless handy rechargeable vacuum cleaner.
It is wet and dry, can suck up dust and water easily.
It is very convenient for home or any similar places.
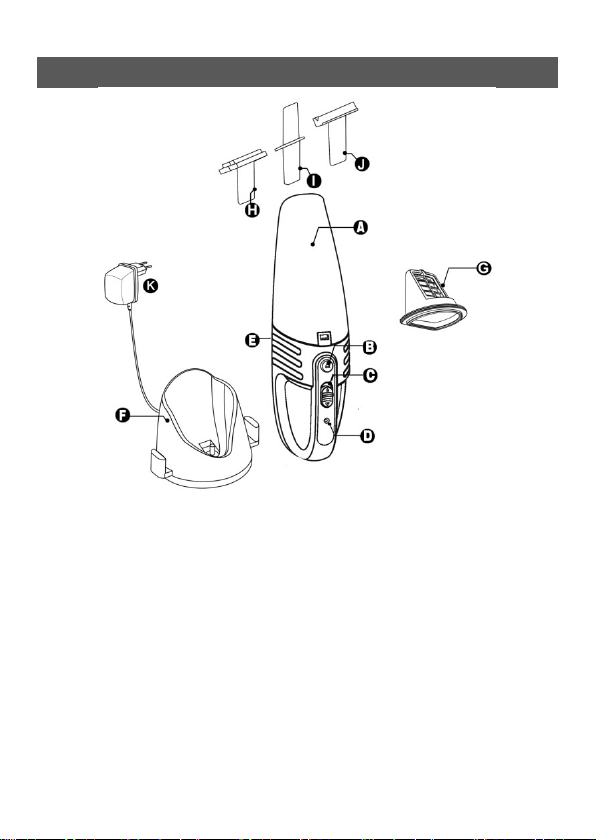
General description( Fig. 1)
A. Dust compartment
B. Dust compartment release button.
C. On/off slide
D. Charging light(LED)
E. Exhaust air openings
F. Charge base
G. Filter unit
H. Brush tool
I. Crevice tool
J. Squeegee
k. Adaptor

Important
Read this user manual carefully before you use the
appliance and save it for future reference.
Danger
- Never suck up flammable substances or corrosive
liquids and do not suck up ashes until they are cold.
- Never immerse the vacuum cleaner or the charger in
water.
Warning
- Check if the voltage indicated on the appliance
corresponds to the local mains voltage before you
connect the appliance.
- Do not use the appliance if the plug, the mains cord
or other parts are damaged.
- If the cord of the adaptor is damaged, it can not be
replaced and the adaptor must be discarded.
- The adaptor and the charge of this appliance can not
be replaced. If the adaptor or charger is damaged,
the appliance must be discarded.
- This appliance is not intended for use by persons
(including children) with reduced physical, sensory
or mental capabilities or lack of experience and
knowledge, unless they have been given supervision
or instruction concerning use of the appliance by a
person responsible for their safety.

- Children should be supervised to ensure that they do
not play with the appliance.
Caution
- Remove the adaptor from the wall socket before you
clean the charger.
- Only charge the vacuum cleaner with the adaptor and
the charger supplied. During charging, the adaptor
feels warm to the touch. This is normal.
- Do not hold the appliance with the dust compartment
pointing upwards and do not tilt the appliance to
one side when you suck up liquids.
- Always switch off the vacuum cleaner after use.
- The voltage on the contact strips in the charger is low
and therefore not dangerous.
- Never block the exhaust air openings during
vacuuming.
- Switch off the appliance when you recharge it.
- Always use the vacuum cleaner with the filter unit
assembled.
- When you have used the appliance to suck up liquids,
empty and dry the dust compartment before you
store the appliance in the charger.
- To avoid the risk of electric shock, be careful when
you drill holes in the wall to attach the charger,
especially close to a wall socket.

Preparing for use
Installing the charger
1. Attach the charger to the wall as shown(Fig.2).
If you attach the charger to the wall, the space
between the screw holes has to be 3.7 cm.
2. You can also place the charger on a horizontal
surface(e.g.a table or desk)(Fig. 3)
(Fig.2) (Fig.3)
Charging the appliance
Charge the appliance for at least 10 hours every time
when the appliance runs out of power.
1. Make sure the appliance is switched off.
2. Put the adaptor in the wall socket,.
3. Place the vacuum cleaner on the charger(Fig.4)
* The charging light goes on to indicate that the
appliance is in charging(Fig.5)

(Fig.4) (Fig.5)
Note: The charging light stays on as long as the
appliance is in the plugged-in charger.
Note:
Using the appliance
The charging light does not give any information
about the battery charge level of the vacuum cleaner.
1. Push the on/off slide
Forwards to the switch
on the appliance.
2. Push the on/off slider
backwards to switch
off the appliance (Fig.6) .
Accessories
The appliance comes with the following accessories:
- a brush tool to clean delicate surfaces;
- a crevice tool to vacuum corners or narrow gaps;
- a squeegee to suck up liquid.
(Fig.6)

1. Take the accessory you want to use.
2. Attach the accessory to the nozzle of the appliance.
(Fig.7)
Sucking up liquid
Connect the squeegee to the appliance.
1. Hold the appliance with the nozzle pointing
downwards at an angel of 30o.
Note:
pointing upwards when there is liquid in the dust
Never hold the appliance with the nozzle
compartment.
Note:
appliance when there’s liquid in the dust compartment
Do not tilt the appliance to one side or shake the
3. Place the squeegee on the surface to be cleaned.
Make sure the squeegee stays in contact with the
surface.
4. Suck up liquid
Stop sucking up liquid when the liquid level inside the
dust compartment has reached the maximum
indication.
Fig.7

5. Empty and dry the dust compartment each time
you have used the appliance to suck up a liquid.
Cleaning:
When you have used the appliance to suck up liquid
always empty and dry the dust compartment after use.
Clean the appliance with a damp cloth.
1. Hold the appliance over a dust bin, press the dust
compartment release button(1) and remove the
dust compartment(2) .(Fig.8)
2. Remove the filter unit from the main body(Fig.9).
3. Empty the dust compartment by shaking it with
the free hand(Fig.10). If necessary, clean the dust
compartment with a damp cloth.
Make sure you empty and clean the dust compartment
regularly.
(Fig.8) (Fig.9) (Fig.10)
Note:
empty the dust compartment and wipe it dry.
If there is liquid in the dust compartment,
4. Clean the filter unit:
Take out the filter unit from the dust compartment

shave it over a dust bin to release the dust.If
necessary, clean the filter unit with a damp cloth .
clean the filter unit with a brush or with a normal
vacuum cleaner if it is very dirty.
Note: If necessary, you can clean the filter unit in cold
or lukewarm water. Dry the filter thoroughly before
you assemble it to the dust compartment.
5. Put the filter unit back to the dust compartment.
(Fig.11).
7. To reattach the dust compartment, align the slot on
the dust compartment with the projection on the
appliance. First attach the bottom of the dust
compartment(1) and then push the top of the dust
compartment towards the appliance(2) until it
locks into place("click")(Fig.12)
(Fig.11) (Fig.12)
Storage
You can store the vacuum cleaner and the accessories
on the charger.

Replacement
The filter cloth is everlasting.You can wash it.But after
long time use,maybe the filtration not that good. You
can replace the filter cloth after a prolonged period of
use or if you can no longer clean it properly.
Replacing the filter cloth
1. Remove the filter unit from the dust compartment.
2. Undo the screw of the filter plastic cover.(Fig 13)
3. Gently take off the filter cloth and place a new
filter cloth.
4. Do the screw of the filter cover back and fix it
properly.
5. Put the filter unit back into the dust compartment.
Note: Make sure you screw the filter cover in right
position and insert the filter unit in correct way.
(Fig.13)
Table of contents
