Triminator BuckMaster Series User manual

®
buckmaster Series
OWNER'SMANUALv1

CONTENTS
INTRODUCTION ............................................................2
SAFETY MESSAGES....................................................... 2
BUCKER SAFETY............................................................3
IMPORTANT SAFETY INFORMATION ......................... 3
SAFETY LABEL LOCATIONS ......................................... 4
SETUP AND ASSEMBLY ................................................5
COMPONENTS............................................................... 6
OPERATION.................................................................... 8
CONTROLS .....................................................................9
STARTING THE BUCKER .............................................10
BUCKING TIPS .............................................................11
MAINTENANCE SAFETY .............................................12
DISASSEMBLE FOR CLEANING AND SERVICE........13
CLEANING AND REASSEMBLY ..................................15
TAKING CARE OF UNEXPECTED PROBLEMS..........17
CUSTOMER SERVICE ..................................................18
LIMITED WARRANTY ..................................................19
EXCLUSIONS FROM WARRANTY COVERAGE.........20

INTRODUCTION
Congratulations on your selection of the Triminator commercial bucker. We want to
help you to get the best results from your new bucker and to operate it safely. This man-
ual contains the information on how to do that; please read it carefully before you set
up and use your bucker. This manual reects the instructions for both the BuckMaster
and BuckMaster Pro machines.
We suggest you read the LIMITED WARRANTY (page 19) to fully understand coverage
and your responsibilities of ownership. Keep this owner’s manual handy, so you can
refer to it at any time. This owner’s manual is considered a permanent part of the bucker
and should remain with the bucker if resold. The information and specications includ-
ed in this publication are those that were in eect at the time of approval for printing.
Mosman Machinery Company, Inc. reserves the right, however, to discontinue or change
specications or design at any time without notice and without incurring any obligation
whatever. No part of this publication may be reproduced without written permission.
SAFETY MESSAGES
Your safety and the safety of others are very important. We have provided important
safety messages in this manual and on the Triminator. This information alerts you to
potential hazards that could hurt you or others. Please read these messages carefully. Of
course, it is not practical or possible to warn you about all the hazards associated with
operating or maintaining a bucker. You must use your own good judgment.
You will nd important safety information in a variety of forms:
Safety Labels - located on the bucker.
Instructions - how to use this bucker correctly and safely.
Safety Messages - preceded by a safety alert.
A symbol and one of two signal words: DANGER, CAUTION. These signal words mean:
Each message tells you what the hazard is, what can happen, and what you can do to
avoid injury.
Damage Prevention Messages - You will also see other important messages that are
preceded by the word NOTICE. This word means:
2
DANGER
!CAUTION
You WILL be KILLED or SERIOUSLY
HURT if you don’t follow instructions.
You CAN be KILLED or SERIOUSLY
HURT if you don’t follow instructions.
NOTICE Your bucker or other property can be dam-
aged if you don’t follow instructions.

BUCKER SAFETY
IMPORTANT SAFETY INFORMATION
Triminator commercial buckers are designed to remove owers from stems on a variety
of herbal material. Other uses could result in injury to the operator or damage to the
bucker and other property. Injuries and property damage from buckers can be prevent-
ed by following all instructions in this manual and on the bucker. The most common
hazards are discussed below, along with the best way to protect yourself and others.
Avoid Rotating Rubber Rollers
The Triminator’s rubber rollers can cause serious damage, cuts and even amputate
ngers or hands. Keep hands, arms, and body away from the rubber rollers whenever
the drum drive motor is running. Keep hair, clothing, and jewelry away from the rollers.
If you need to work around the bucker to clear or clean plant material for any reason,
always shut o the electric motor and disconnect the bucker’s power cord from the AC
outlet. Never put your hand in contact with the rubber rollers while the machine is run-
ning; serious personal injury could result.
Clear Operation Area
Before operating the bucker, carefully inspect the surrounding area and remove all obvi-
ous hazards that could cause you to trip, slip, or fall into the bucker.
Keep Guards and Shields in Place
Guards and shields are designed to protect you from touching moving components. For
your safety and the safety of others, keep all shields in place when the bucker is run-
ning.
Turn Electric Motor O When Not Operating the Bucker
If you need to leave the bucker for any reason, always turn the electric motor o.
Operate on Flat Surface
To avoid overturning, only operate the bucker on at surfaces. Control the bucker care-
fully when transporting it across uneven ground or slopes. Do not push the bucker down
or across steep slopes: the bucker could overturn, causing injury to the operator or
bystanders.
Operator Responsibility
Know how to stop the bucker quickly in case of emergency. Understand the use of all
bucker controls. Never permit anyone to operate the bucker without proper instruction.
Do not let children operate the bucker.
3
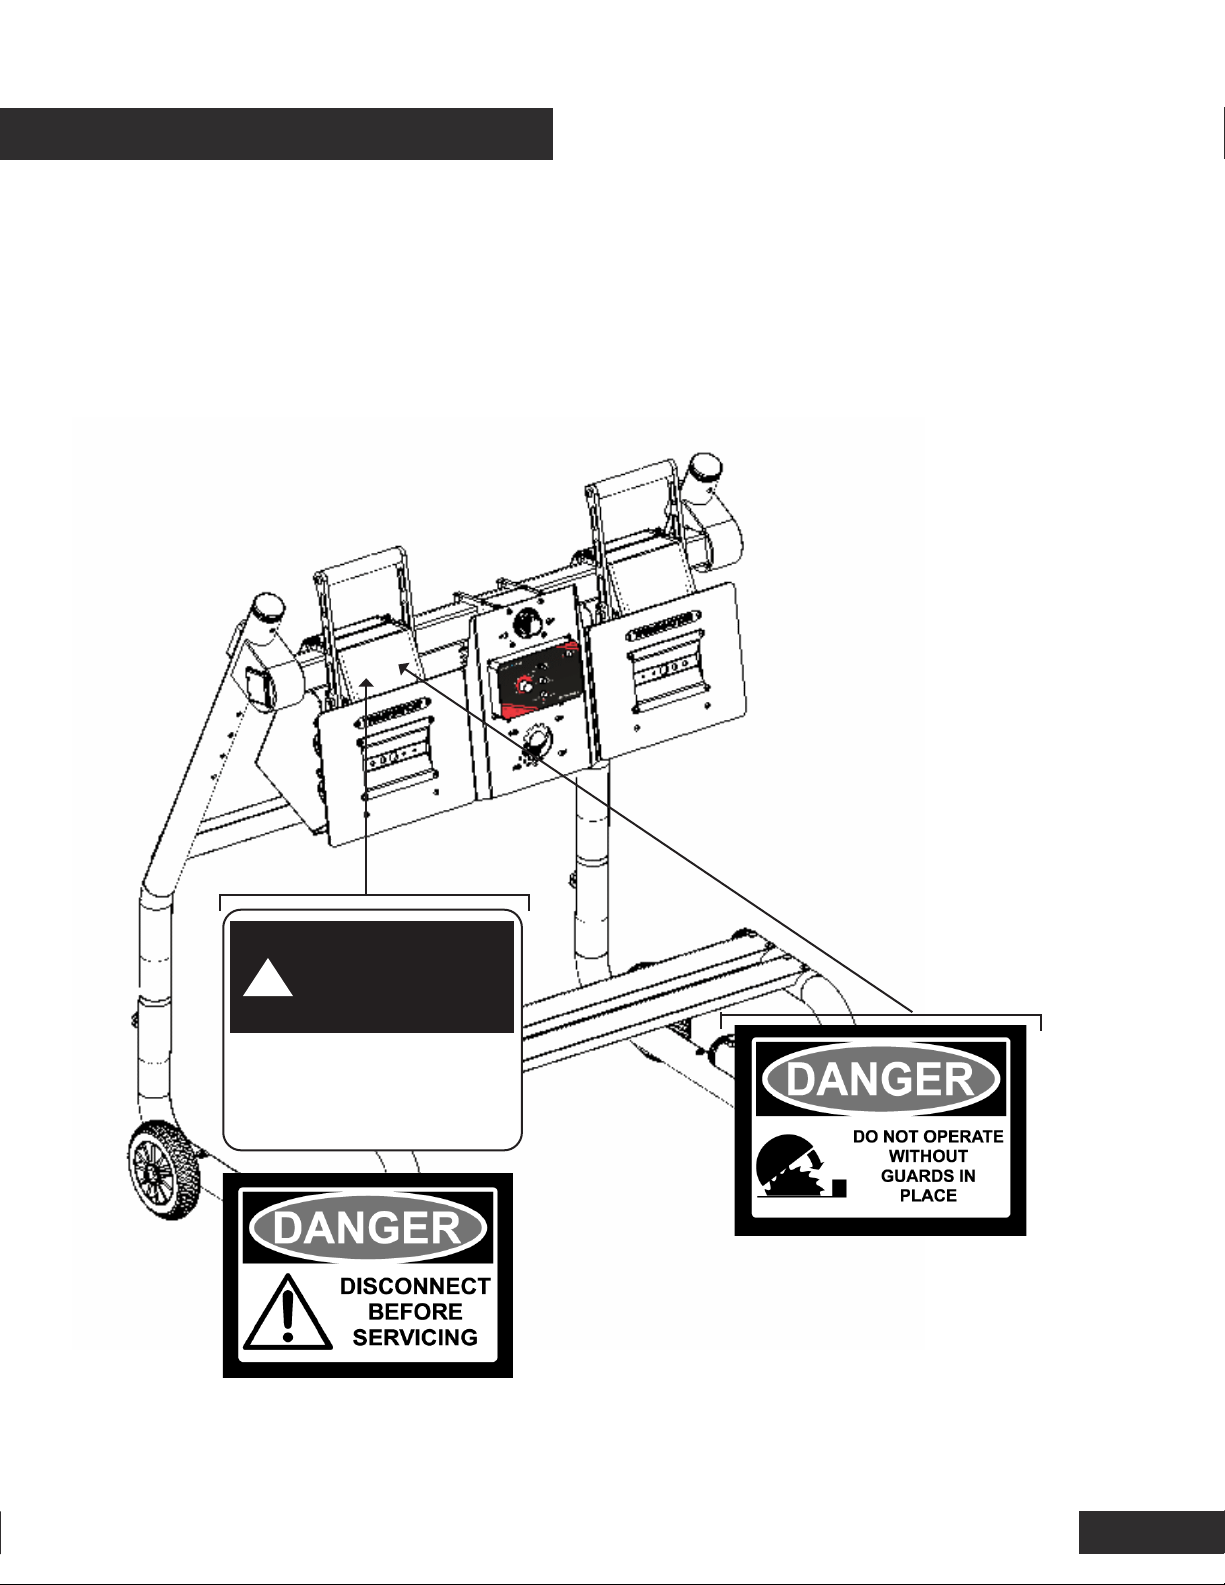
SAFETY LABEL LOCATIONS
43
!CAUTION
Read user guide
before operating

SETUP AND ASSEMBLY
5
UNPACKING and INSPECTION
Triminator BuckMaster comes in shipping boxes disassembled. Upon receipt
please check the boxes for damage and mark any damage on the shipping BOL and
follow the shipper’s instructions.
1. To begin, disassemble the shipping boxes. Make note of any damage, which is
identied on either the machine parts or the shipping crate. Notify the shipper,
your dealer and MMC immediately, should damage be identied.
2. Remove the components from the packaging and place them on a at and level
surface.
ASSEMBLY:
Required tools
Standard hex wrench set
Personnel
Two people are recommended to help with the assembly of the BuckMaster Ma-
chines. It can be completed with one person, however assembly may take longer
and be more dicult.
Instructions
Follow the video instructions at the link below:
BUCKMASTER SERIES
http://bit.ly/buckmasterproassembly
65
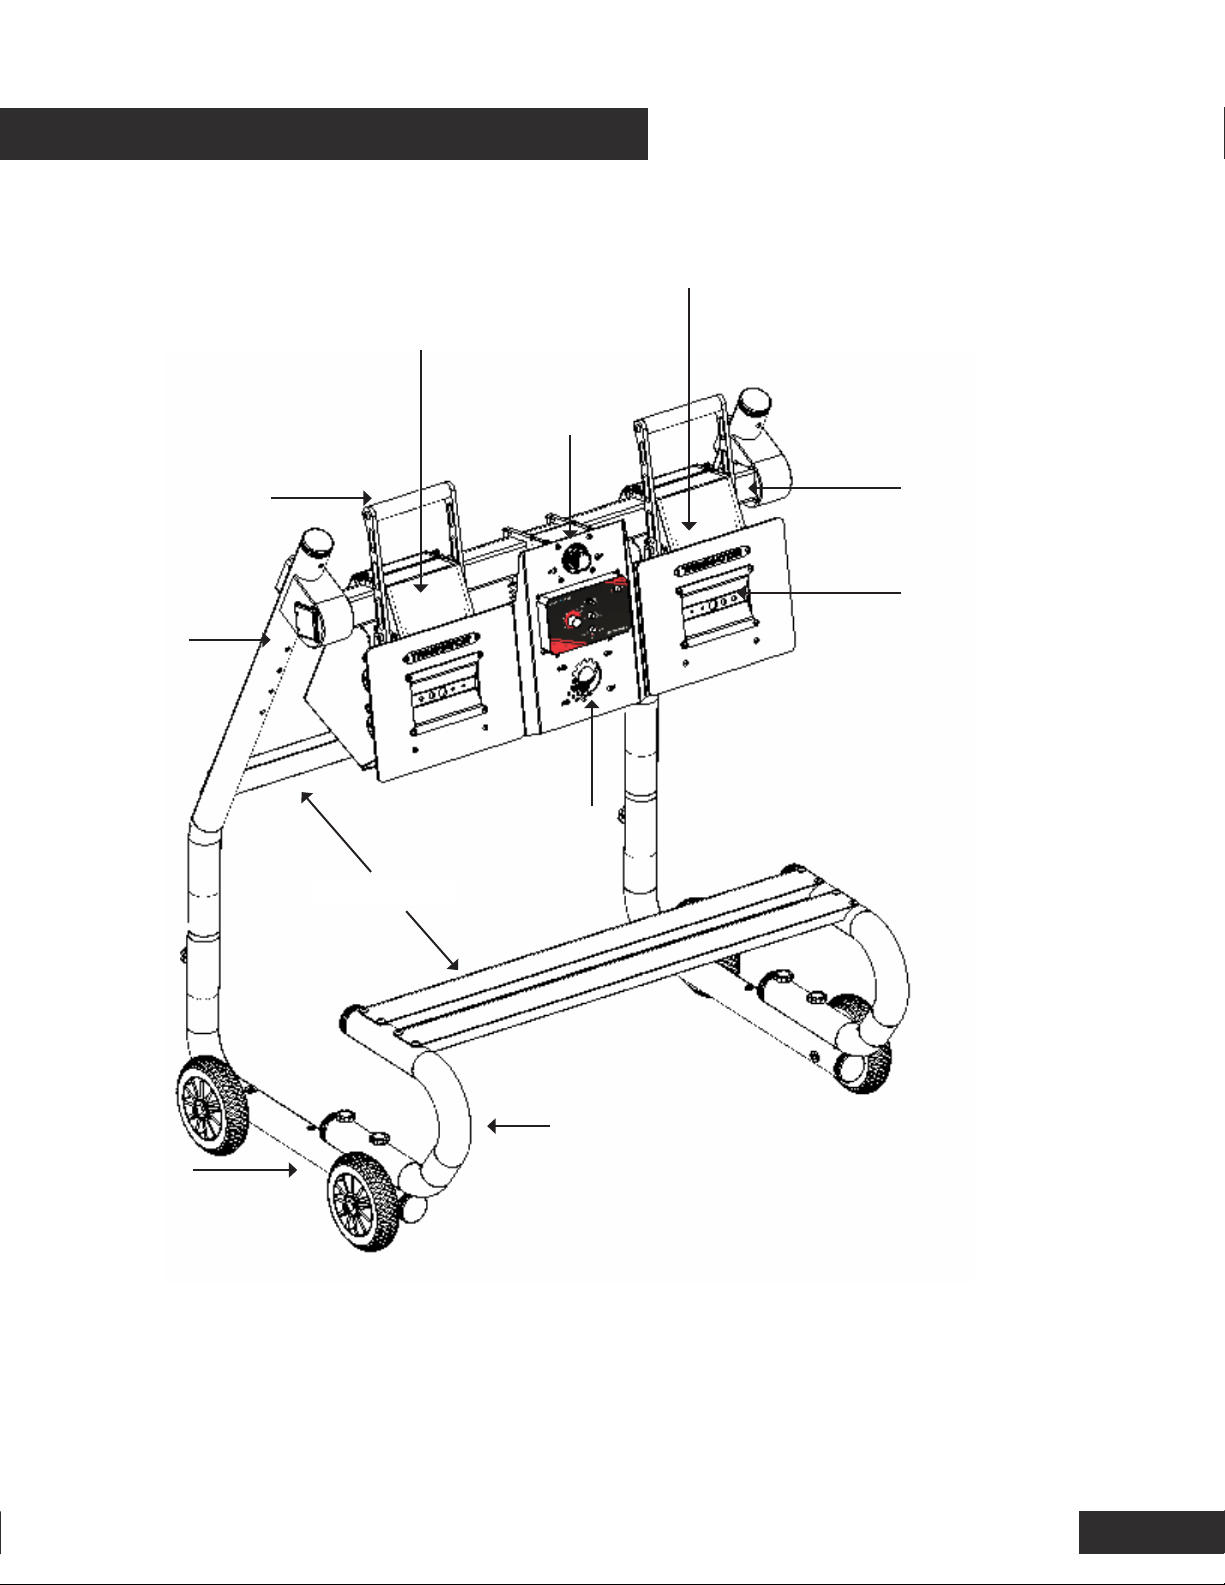
ROLLER ASSEMBLY
Contains rubber rollers, roller
guard, and bucking plates
ROLLER HANDLE
Releases tension
on rubber roller
wheels
COMPONENTS
MOTOR ASSEMBLY and CONTROLS
Contains motor, speed controller, power
and on/o switches
CROSS BARS
MATERIAL HOLDER
Used for ergonomic placement
of material collection bins
ADDITIONAL ROLLER ASSEMBLY
(PRO MODELS)
Contains rubber rollers, roller guard,
and bucking plates. Available only on
Pro models or as a Pro upgrade
BUCKING PLATE
Change from wet
to dry bucking by
changing this plate
UPPER
STAND LEG
LOWER
STAND
LEG
CROSS TUBE
EMERGENCY STOP

BEFORE OPERATION
Read and understand this manual. Know what the controls do and how to operate
them. Familiarize yourself with the bucker and its operation before you begin using
it. Know how to quickly shut o the machine in case of an emergency.
Your safety is your responsibility.
IS YOUR BUCKER READY FOR OPERATION?
For your safety, and to maximize the service life of your equipment, it is very im-
portant to take a few moments each time before you operate the bucker to check
its condition. Be sure to take care of any problem you nd before you operate the
bucker.
Improperly maintaining this bucker, or failing to correct a problem before opera-
tion, could cause a malfunction which could cause you to be seriously injured.
Always perform a pre-operation inspection before each operation, and correct any
problem.
Before beginning your pre-operation checks, be sure the bucker is on a level sur-
face, the motor timer switch is in the OFF position, and all power cords are un-
plugged.
Check the General Condition of the Bucker
Clean the rubber rollers, bucking plates, and tension system. Look for signs of
damage.
Check each control for proper operation.
Check parts for wear. Replace if necessary.
Check that all nuts, bolts, and clamps are tightened appropriately.
KEEP ALL SHIELDS, GUARDS AND COVERS IN PLACE WHILE OPERATING THE BUCKER.
BEFORE OPERATION
7

OPERATION
8
CHECK YOUR WORK AREA
For your safety and the safety of others, always inspect the area before operating
the bucker.
Objects: Anything which can be grabbed by the rotating rubber rollers is a poten-
tial hazard to you and others. Look for hazards and remove them from the work
area. Tie back loose clothing and long, loose hair. Remove any jewelry.
SAFE OPERATING PRECAUTIONS
Before operating the bucker for the rst time, please review both the Bucker SAFE-
TY section (page 3) and the BEFORE OPERATION section (page 7).
Even if you have operated other buckers, take time to become familiar with how
the Triminator works.
Never tamper with or alter any of the controls or safety devices on the bucker.
Do not operate on slopes.
Never operate Triminator while under the inuence of drugs, alcohol or prescrip-
tions, including over-the-counter cold/u medications and allergy medications.
Protective clothing and eye and/or hearing protection should be worn during oper-
ation.
For your safety, do not operate while wearing loose-tting clothing, jewelry, etc..
Long hair should be secured in a manner that keeps it away from mechanical parts.
Rotating machinery parts can entangle loose clothing, long hair or dangling jewelry
resulting in serious injury or death.
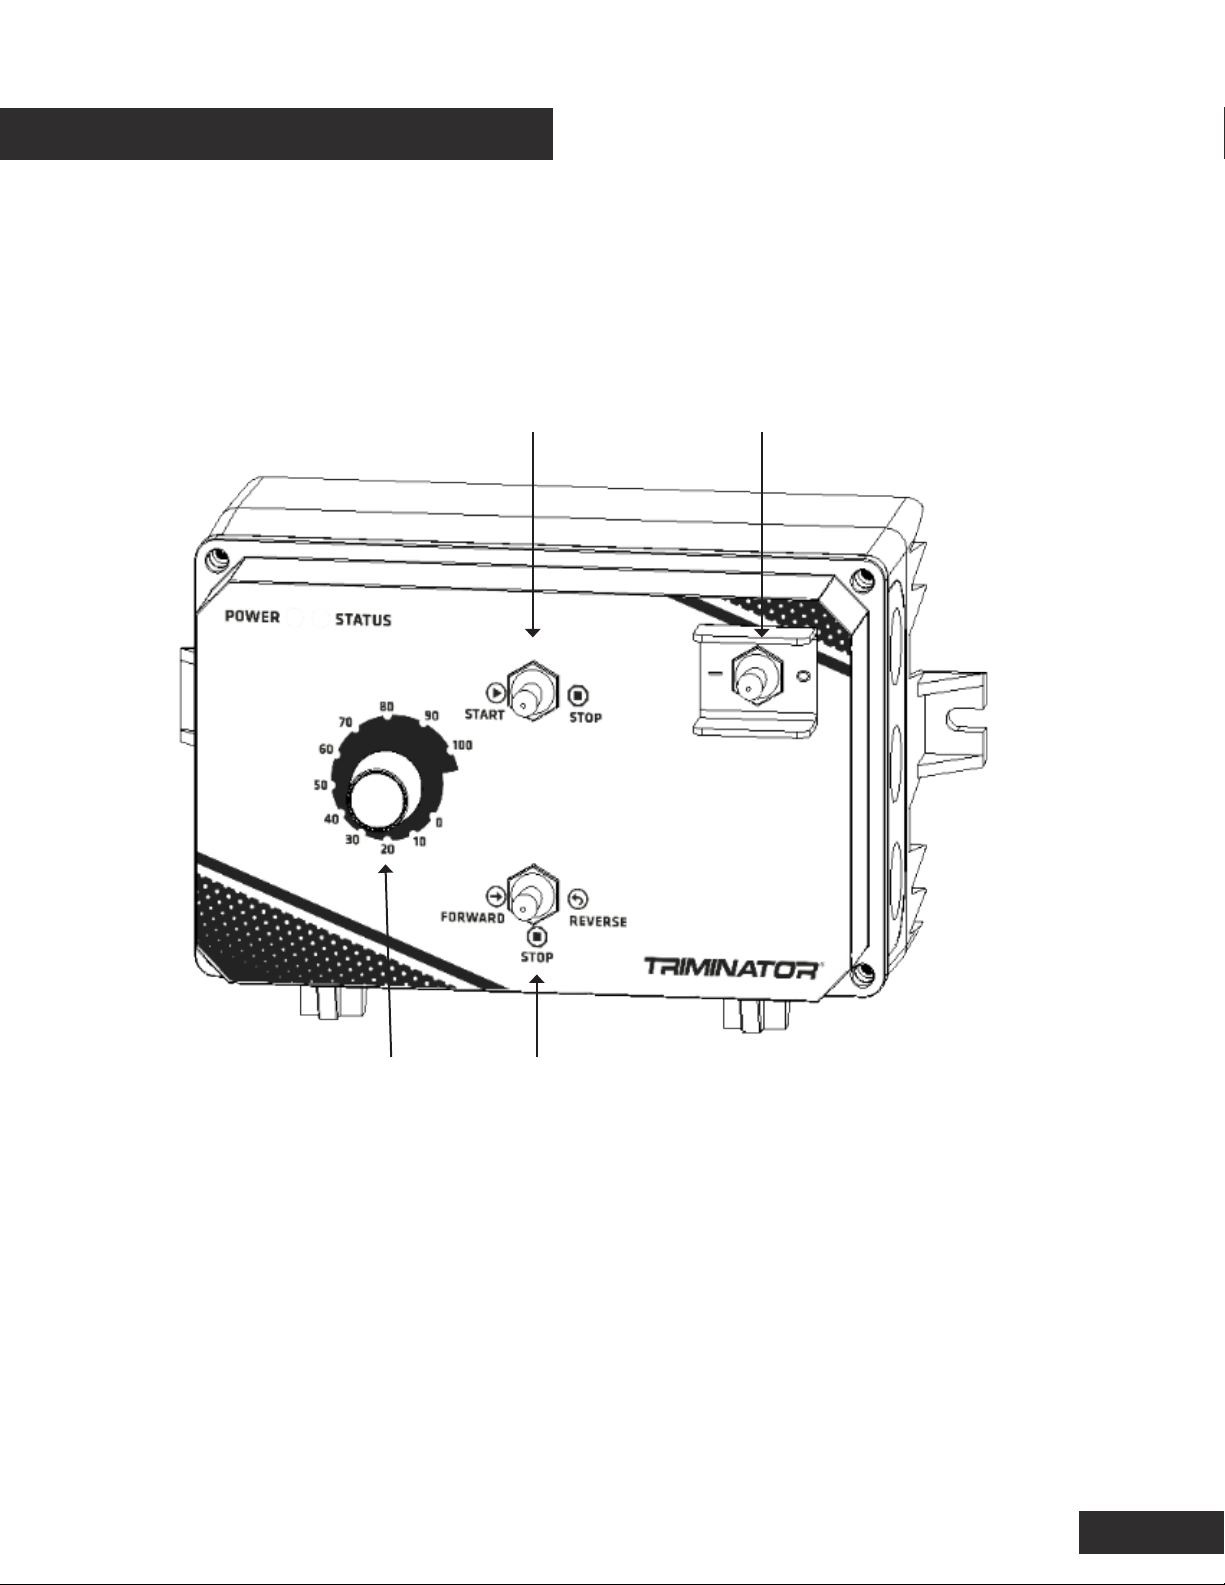
CONTROLS
9
NOTICE: The BuckMaster series oers redundancy controls for safe operation. In
order to operate all controls must be in an active position and the emergency stop
must be in an operating position.
FORWARD/REVERSE SWITCH
Controls the direction of the
rollers.
SPEED CONTROL DIAL
Adjusts roller speed
POWER SWITCH
Activates power to the unit.
START STOP
Activates the forward/reverse
switch.
Table of contents
Other Triminator Industrial Equipment manuals


