Ricoma RCM 1501 PT User manual

Owners Manual
RCM 1201 PT / RCM 1501 PT

Table of Contents
•Threading the Machine……………………………………………..Page 3-6
•Selecting Needle and Thread……………………………………….Page 7-8
•Needle and Hook Components……………………………………..Page 9
•Replacing a Bobbin…………………………………………………Page 10
•Digital Control Panel……………………………………………….Page 11
•Loading Designs……………………………………………………Page 12-13
•Design Parameters………………………………………………….Page 14-16
•Adjusting Machine Parts……………………………………………Page 17
•Adjusting Needle Position……….…………………………………Page 18
•Presser Foot………………………………………………………....Page 19-20
•Adjusting the Hook…………………………………………………Page 21
•Adjusting the Upper/Lower Dead Point……………………………Page 22-23
•Adjusting the Picker………………………………………………..Page 24-26
•Adjusting the Take-Up Lever Position……………………………..Page 27
•Adjusting the Wiper………………………………………………...Page 28
•How to Replace the Needle Bar Reciprocator……………………...Page 29-30
•No Trimming/Short Trims………………………………………….Page 31
•Maintenance and Checkup of Machine…………………………….Page 32-35
•Troubleshooting…………………………………………………….Page 36-41
2

Threading your new machine
Pull the thread off the cone to the eyelet directly above the cone! Do not cross over
another thread. Pass the thread through each eyelet necessary until you come to the upper
tension.
Pass the thread around the upper
tension making sure to pull the
thread tight inside the disk and
over the post at the bottom.
Pull the thread tube loose from
the tension. Using the threading
inserts provided, pass the inserts
through the tube and wrap the
thread into the cut on the insert
and pull through. Replace the
tube into the tension.
Showing two different needles #5
and #8.
Press on the opposite end of
clip “A” to slide thread
underneath.
Grab the post “B” with the thread
and pull to the right around the
tension disk and up and over the
post “C”. Pull tightly into the disk.
Come to the right side of post “D”
to the left side of post “E” and
back over the top of the roller
wheel in a clockwise motion,
finishing with a turn to the left side
of post “F”
Another clip “G” same as top.
3

Lift the take-up spring lever to place
the springs into the proper position.
Pass the thread under the bars and
through the spring.
Pull upwards to the take up lever and
down through the eyelet.
The check spring lever must be in the correct position to thread.
Be sure to place it back into the sewing position!
While the check spring and the lever may be a little confusing at first, you will notice that
it will give you a better adjustment range for sewing lightweight to heavyweight
materials.
For sewing heavy materials place the springs lower.
For sewing lightweight materials place the springs higher. Make sure they are engaging!
Adjust using sewing quality as a guideline.
4

Thread the eye.
Place the thread behind the thread
guide.
Pull the thread through the foot
and back upwards
to the spring to hold it for the first
stitch.
When replacing a needle make sure you place it all
the way upward to the needle stop hole.
Periodically clean the needle stop hole and do not
overlook this area. A buildup of dirt will cause needle
insertion problems, as well as stitch problems.
The front groove of a needle: It protects the thread from
The fabric as it pierces the fabric reducing friction thread breaks.
It is also instrumental in the formation of the sewing loop.
The scarf of the needle : this is where the hook picks up the thread. It should be placed
to the rear.
5

Special note on using thread guides.
Be sure to always use the last thread guide located on the needle clamp.
Below you can see the effect it has on your thread as it passes through the
material.
NEEDLES
It is important to select the proper needle according to the material you embroidery and
the type of threads.
Inadequate choice of the needle and the thread may cause various problems such as loops
on top of the logo, thread breaks, and skipped stitches (areas that do not sew).
Use a DB x K5 for embroidery. Use ballpoints for stretch materials, use Sharps for
cottons, etc.
The eye of DB x K5 needle is two times bigger than the DB1 (use for general sewing
The application range of a thread and a needle use for general embroidery is as follows.
6

6. Selecting a thread and a needle
It is important to select the proper needle according to the material you embroidery and the
type of threads.
Inadequate choice of the needle and the thread may cuse various problems such as loops on top
of the logo, thread breaks, and skipped stitches (areas that do not sew).
Use a DB x K5 for embroidery. Use ballpoints for stretch materials, use Sharps for cottons, etc.
The eye of DB x K5 needle is two times bigger than the DB1 (use for general sewing).
. The relation between a needle and a thread
1. The application range of a thread and a needle use for general embroidery is as follows.
daerhTafoeziSeldeeNafoeziS
U.S.A. Japan Germany Cotton Silk Nylon Rayon
0.25 9 65
0.27 10 70
70~80 100~120 130~150 70~100
0.29 11 75
0.32 12 80
50~60 80~100 100~130 100~130
0.34 13 85
0.36 14 90
50~60 60~70 80~100 130~150
The front groove of a needle: It protects the thread from
as it pierces the fabric reducing friction thread breaks.
It is also instrumental in the formation of the sewing loop.
The scarf of the needle: this is where the hook picks up the thread.
7

. Changing a needle
1. Insert a new needle into the needle clamp, pushing firmly upward until the needle is set
against the top of the needle stop hole.You need to clean the hole occasionally to prevent a build-up of wax/lint.
3. When using a special thread like rayon, metalic, etc.,
set the needle by turning the groove part of the
needle to the right slightly as shown in the illustration.
Check to make sure the needle is centered in the presser foot.
2. Position the needle so the front groove faces foward with the scarf to the rear.
8

7. The relation between a needle and a hook
. Adjusting the timing of a needle and a hook
1. The timing of the needle and the hook is set up
at 195oand the relation between the needle and the
hook is as follows.
2. The space of the needle and the hook
of 0.1 ~ 0.3 mm is proper.
If the space between the needle and the hook point
is out of the range, the thread will not catch causing
thread breaks, and if too close broken needles.
. Special note on using thread guides.
Be sure to always use the last thread guide located on the needle clamp.
Below you can see the effect it has on your thread as it passes through the material.
9
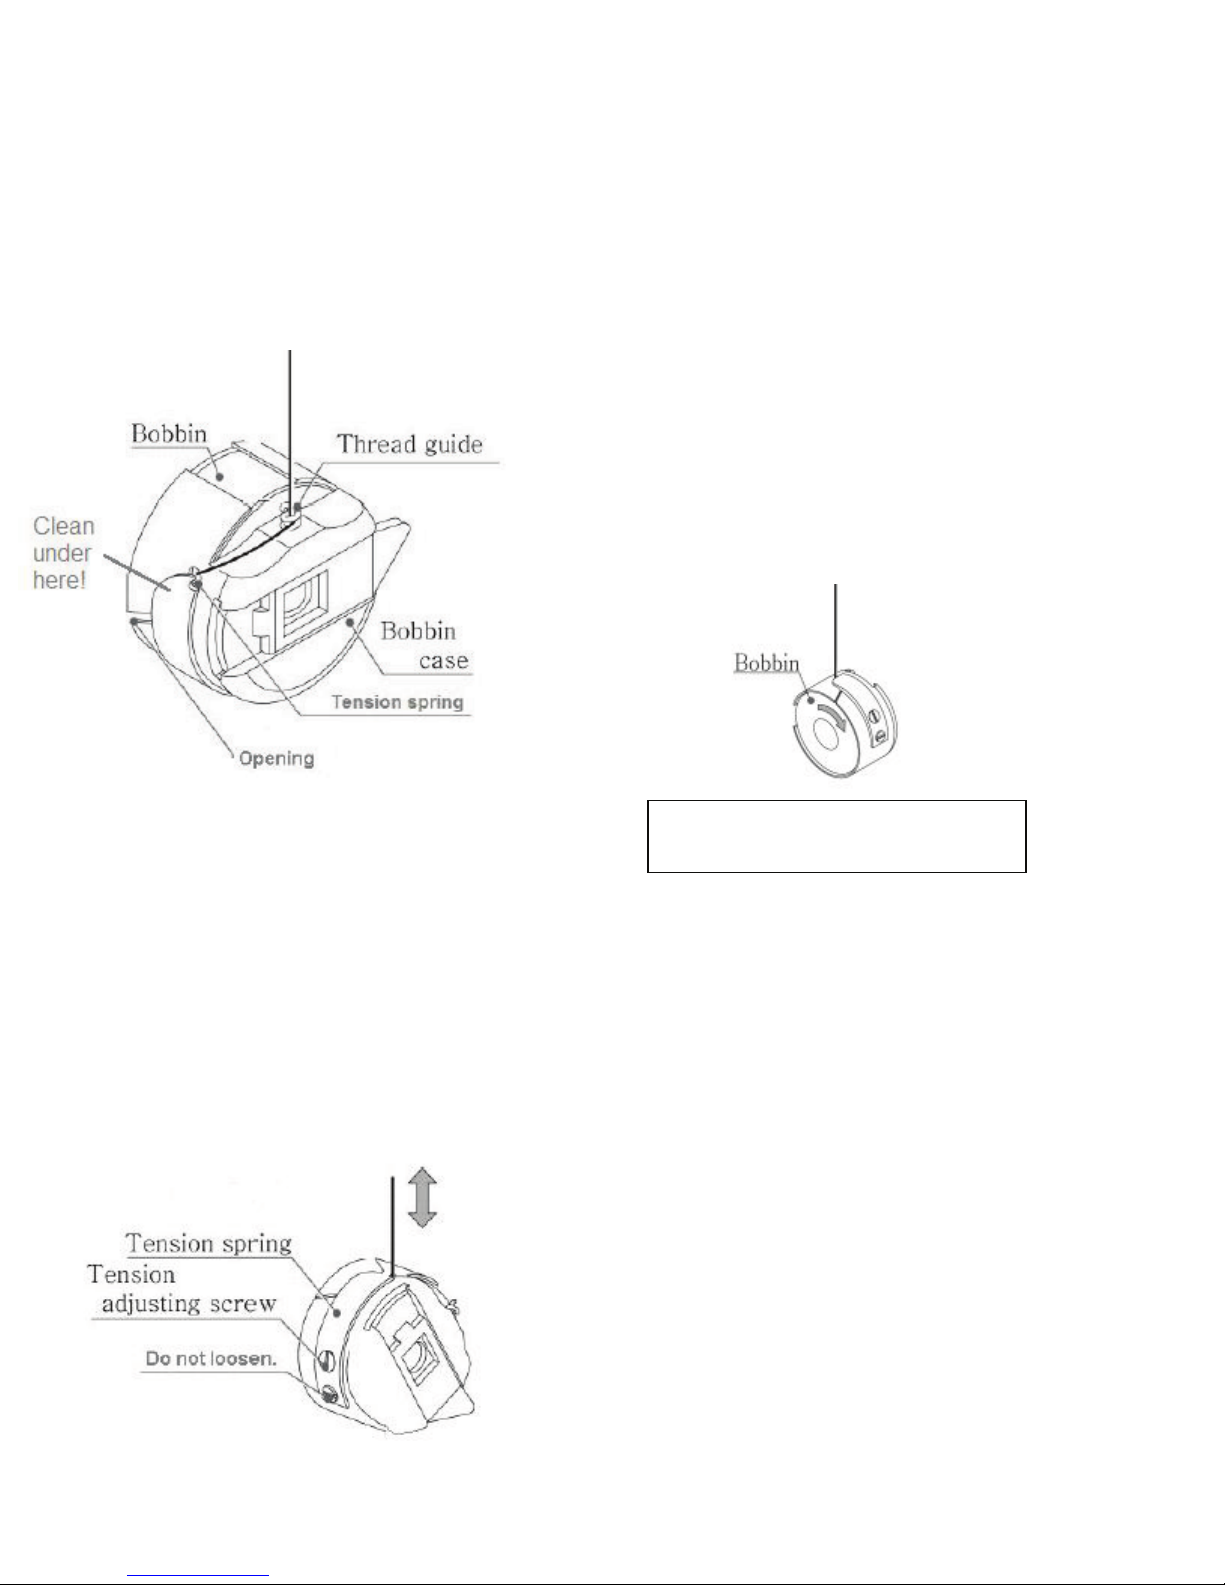
The approximate tension is set when one
can shake the bobbin case slightly, and
the thread unwinds and the bobbin case
falls approximately 1 to 3 inches before
stopping.
*Note- If using a bobbin case tension
gauge the approximate setting should be
between 25-35 grams.
Replacing a Bobbin
1. Place a new bobbin in the bobbin case and pass the
thread through the opening in the bobbin case,
pull
the thread under the tension spring.
2. Pull the thread through the thread guide,
cut the thread leaving a 2 inch tail.
Insert the bobbin case into the hook; be sure it is
locked in.
Adjusting the lower thread tension
An adjusting screw adjusts the lower thread tension of the tension spring in the
bobbin case.
If the screw is turned clockwise, the lower thread tension will be higher and if it is
turned counterclockwise, the lower thread tension will be lower.
When viewed from behind, the
bobbin should turn clock-wise.
10
This manual suits for next models
1
Table of contents
Other Ricoma Sewing Machine manuals

Ricoma
Ricoma CHT2 User manual

Ricoma
Ricoma EM-1010 User manual

Ricoma
Ricoma EM-1010 User manual

Ricoma
Ricoma MT-1502 User manual

Ricoma
Ricoma SWD Series User manual

Ricoma
Ricoma EM-1010 User manual

Ricoma
Ricoma TCS1501 User manual

Ricoma
Ricoma 8S User manual

Ricoma
Ricoma RCM-1201TC-7S User manual

Ricoma
Ricoma RCM-1201PT User manual


